%20(1).svg)

.webp)
.svg)


Looking for Senior AWS Serverless Architects & Engineers?
Let's TalkThis article is part of a series:
GitHub Repository: https://github.com/serverless-guru/real-time-weather
In part one, we covered how to hook up AWS IoT MQTT with a ReactJS frontend. Giving our ReactJS application real-time communication where every device will instantly* be updated when a new message is published to our MQTT topic.
In part two, we will be extending the application to include the Serverless Framework and do the following:
- Create a basic Serverless Framework project
- Dive into best practices with Serverless Framework
- Add AWS resources
- Deploy to AWS
- Test the deployed AWS backend
Let’s get into it!
Create a basic Serverless Framework project
If you’re not familiar with the Serverless Framework and/or do not have an AWS account set up already. Please go through our Introduction to Serverless Framework article or optionally visit our training site and take the Serverless Introduction course.
Create a new project
We will create a new project using a Serverless Framework template which automatically sets up a NodeJS Lambda function ready to deploy to AWS. Since we already created a project last time, just make sure you’re in the project directory.
This command will create a new Serverless project using aws-nodejs template giving us some boilerplate in a folder called backend with a service name equal to real-time-weather 🔥 🔥
First off let’s crack open our favorite text editor and then I’ll show you how to copy/paste like a Senior Cloud Developer!
Update the provider section (add command line flags)
We will want to be able to pass in a dynamic stage variable, a dynamic region variable, and a dynamic profile variable (for AWS named profiles).
These variables will help ensure:
- the AWS resource names can be different (multi-stage deployments)
- the region can be different (multi-region deployments)
- the AWS account can be different (multi-account deployments)
Let’s copy the following code into our serverless.yml file:
This will add the following things:
- a provider of aws
- a runtime of nodejs12.x
- an optional stage flag with a default stage of dev
- an optional region flag with a default region of us-west-2
- an option profile flag with a default profile of default
To use these flags we will run the following command:
With the resources/provider.yml isolated, let’s now update the serverless.yml to reference our separate file.
Now when we go to make the deployment the provider property will be populated by the resources/provider.yml file.
Create custom variables
Let’s create a custom.yml file under our resources folder at resources/custom.yml. This file will hold all of our custom variables which we can centralize in one place instead of hard-coding in multiple places.
The key things to pay attention too:
- ${self:service} is equal to real-time-weather
- ${self:provider.stage} is equal to dev or the result of --stage <>
With the resources/custom.yml isolated, let’s now update the serverless.yml to reference our separate file.
Now when we go to make a deployment the custom property will be populated by the resources/custom.yml file as if it was written inline.
Add AWS resources
Now that we have a serverless project. Let’s start sprinkling ✨ in our AWS resources. We will add the following:
- DynamoDB — NoSQL database
- Lambda — handles our backend logic
- API Gateway — manages REST API routing
Add DynamoDB
Now let’s create a general.yml file at resources/general.yml and copy the following:
This will create a DynamoDB table which has the following settings:
- a primary key of zip which will be a string
- a billing mode set to pay per request (e.g. no traffic = no cost)
Let’s update the serverless.yml file to include a reference to our resources/general.yml file.
Add the API Lambda function
Now let’s create a functions.yml file at resources/functions.yml and copy the following:
Here we are saying a few things:
- connect our Lambda to the handler() function inside the api.js file
- create an API at /api/weather which can handle GET requests
- set cors: true to allow two-way API communication
- pass an environment variable called TABLE_NAME to our Lambda function
- reference the DynamoDB table name dynamically via Ref: WeatherTable
We then need to update the serverless.yml to utilize our resources/functions.yml file.
Add AWS IAM permissions
Our Lambda function needs to have the proper AWS IAM permissions to access DynamoDB and retrieve weather data.
Let’s add a section to help with this under the provider property in our serverless.yml file.
This will do the following:
- give our Lambda function access to do dynamodb:GetItem
- specify we can only dynamodb:GetItem on the WeatherTable
Review progress
Perfect, let’s review the serverless.yml file so far.
Above, we’ve dramatically reduced the total lines in our serverless.yml file and have chosen to isolate different components of our Serverless backend to separate files. This level of abstraction is particularly useful when you start scaling your projects up.
When your projects grow you may have 3+ DynamoDB tables, a whole slew of supporting AWS services, and 10+ Lambda functions which all need custom variables. As you can imagine this can become hard to manage if it was all pushed into the serverless.yml file.
Therefore we break it up under the resources folder and keep everything nice and neat. That’s called a solid foundation and it’s worth the extra time to set up for every Serverless project you build.
Customize the API Lambda function
First, let’s change the handler.js file to api.js. Then we can paste in the following code:
This code will do a few things:
- import aws-sdk allowing us to connect to DynamoDB
- reference an environment variable via process.env.TABLE_NAME
- add a handleWeather() function to manage all API request to /weather
- add a getCurrentWeatherData() function to request the weather by zip
From here we should have all we need to fetch data via zip (e.g. 97205) and get a response from the DynamoDB weather table with the current weather in our zip.
Deploy the backend to AWS
With all of our automation created, thanks to the power of the Serverless Framework. Let’s try deploying our Serverless stack to AWS.
This will deploy our backend to thetest stage and the us-west-2 region with an AWS named profile of default.
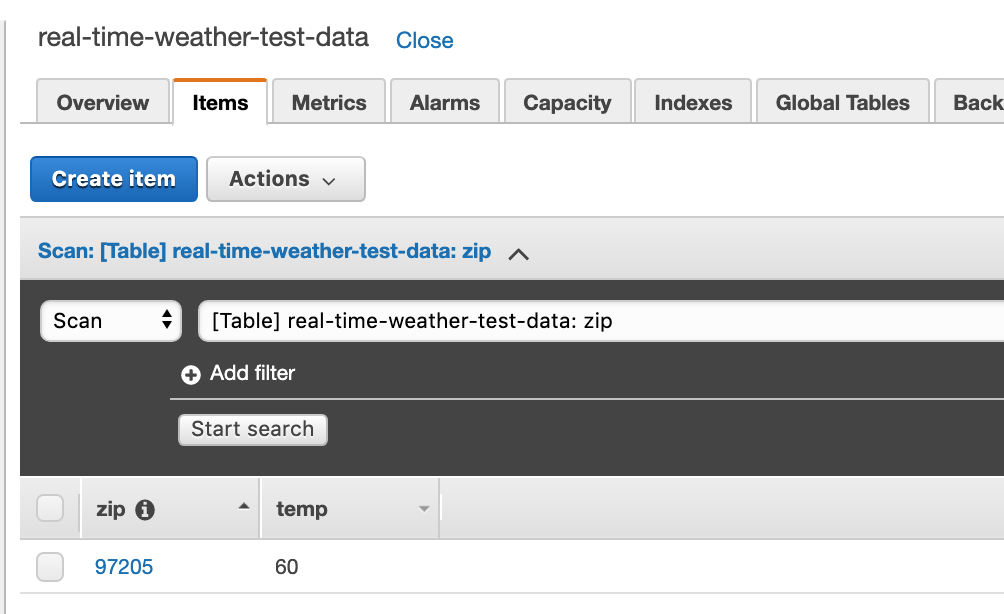
Load some data into DynamoDB
Currently, we only have a GET API endpoint so we will manually add data into DynamoDB then try to pull that data out.
Test the AWS backend
Once we have successfully deployed the backend, we can test the API via Postman by making a request with a queryStringParmeter of ?zipCode=97205.
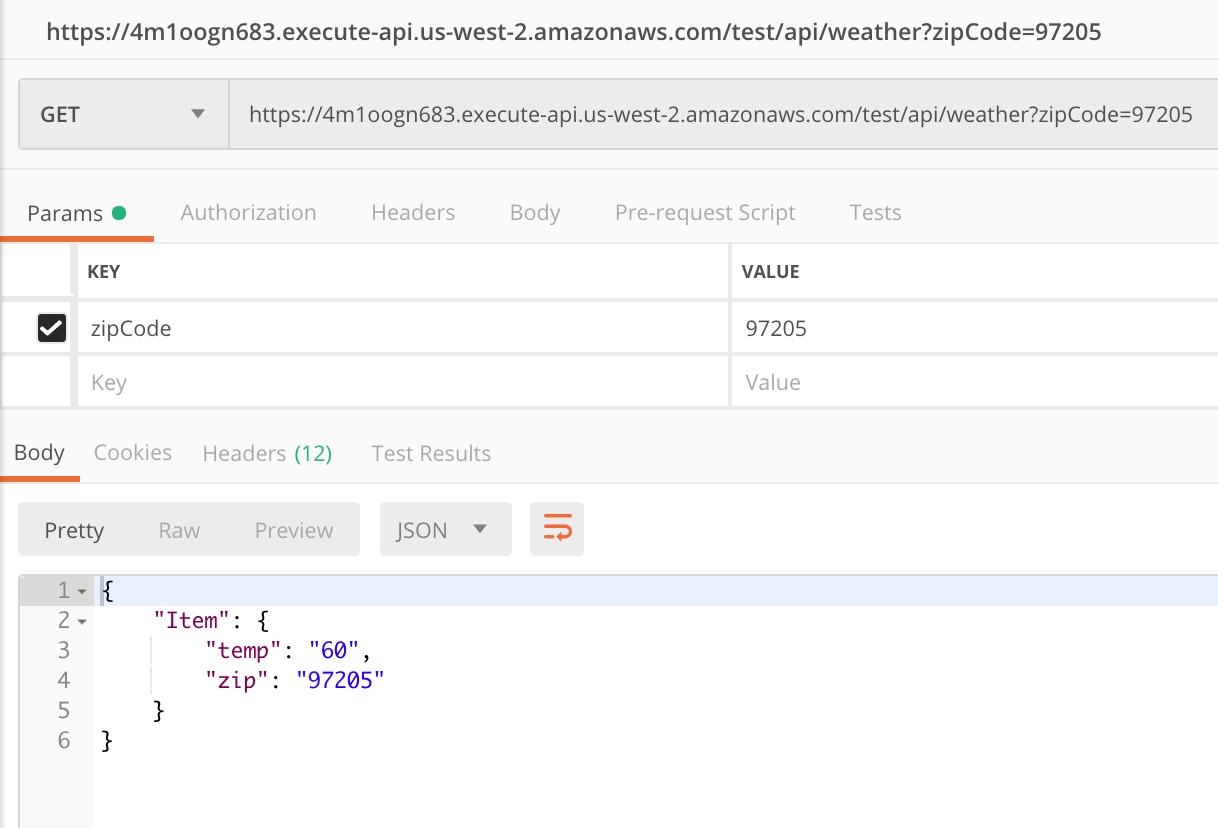
Awesome, we’ve got our data coming back from DynamoDB and we have confirmed that our automation fully works to spin up our entire backend.
Tear down
If you would like to stop here, we can tear down the Serverless backend by running the following command.
This will do the following:
- delete our Lambda function
- delete our API Gateway endpoint at /api/weather
- delete our DynamoDB table
- delete our AWS IAM policies
Next time, we go even deeper
If you enjoyed this tutorial, please stay tuned for part three which will go into creating a Lambda function which is triggered on a schedule and will auto-post messages out to our AWS MQTT devices.
Allowing our users to get real-time weather updates automatically!