In the first part of this series, we built a step functions workflow for a simple apartment booking scenario using the AWS Step functions low code visual editor.
In this post, we’ll look at how to build the same workflow using CDK and python.
So while building out a bigger system(Apartment Complex Management System), I came across an interesting problem.
I’ll assume that most of us have reserved or booked either an apartment or hotel, or flight online.
For this scenario, let’s go with apartments. So when you reserve an apartment, here’s a breakdown in the simplest form of the series of steps that occur after that:
The apartment is marked as reserved, probably with a status change. Let’s say the apartment status changes from vacant to reserved.
This apartment is made unavailable for reservation by others for a particular period of time.
The client is required to make payment within that period of time.
If payment isn’t made within that time, the reservation is canceled, and the apartment status changes back from reserved to vacant.
If payment is made, then the apartment status changes from reserved to occupied/paid.
Building out this business logic using custom code is very possible but inefficient.
Why?
Because as developers, good ones for that matter, we always have to be on the lookout for tools that’ll help us carry out tasks in an efficient and scalable manner.
The series of steps outlined above serves as a good use case for AWS step functions.
The sequence of a service interaction is important
The state has to be managed with AWS service calls
Decision trees, retries, and error-handling logic are required
Solutions Architecture
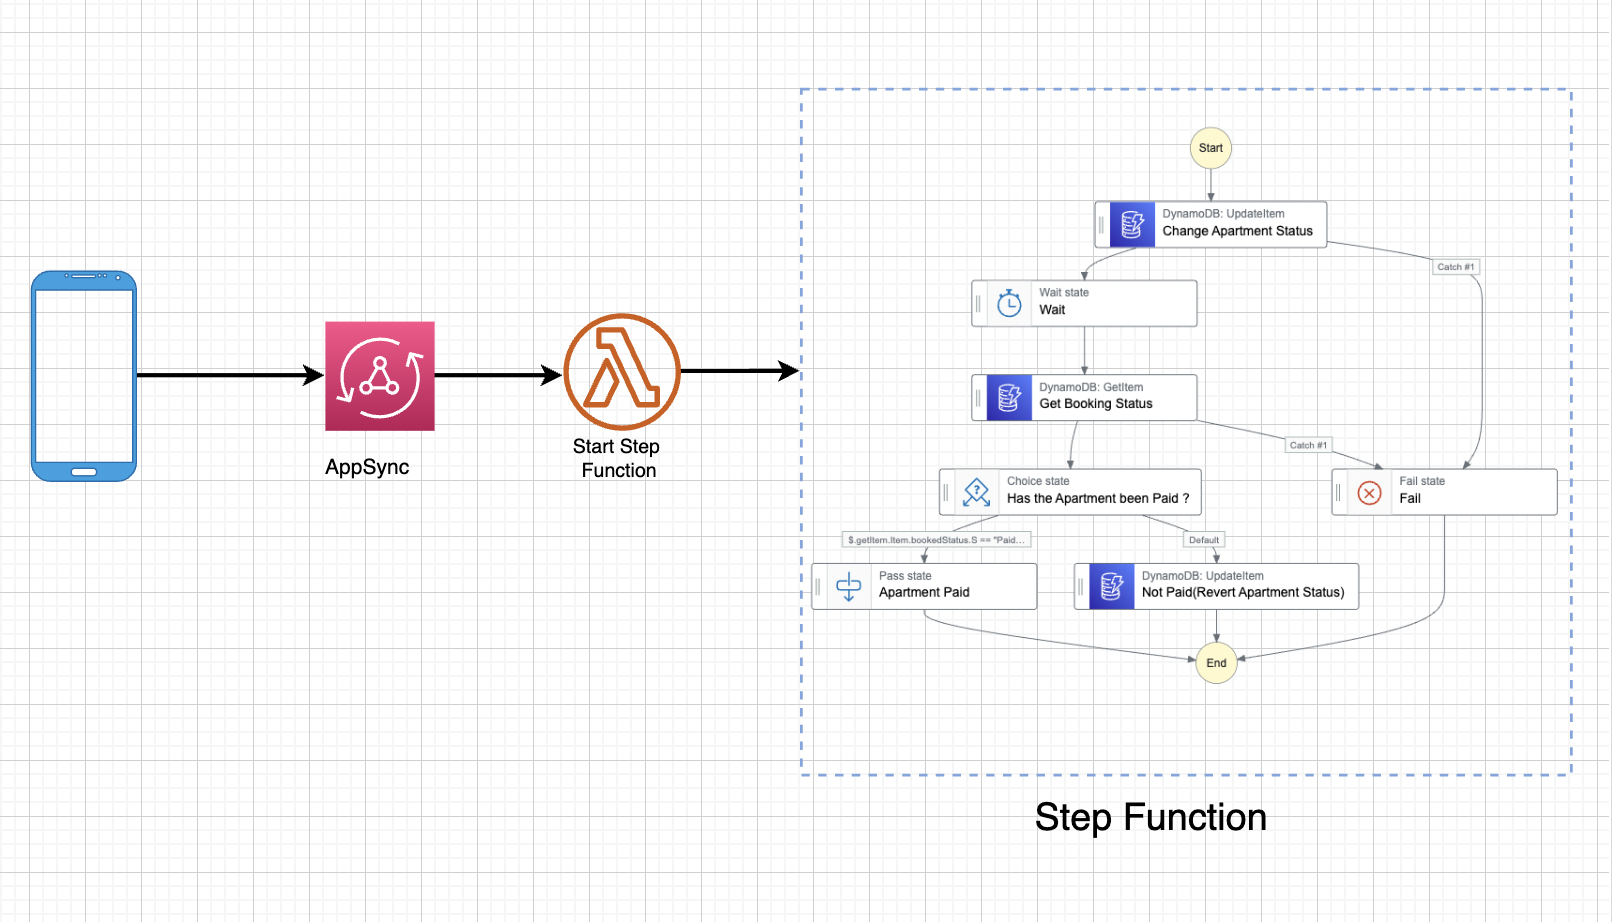
Because we’d love to invoke a step function workflow from a frontend application, we’ll use AppSync to create an endpoint which we’ll call from a mobile app created with AWS Amplify and Flutter.
But for this post, we’ll end at the point where we’ve created the AppSync endpoint.
Let’s get started.
Initialize CDK app
Firstly, create a new project directory. I’m using a Mac, so I’ll create mine and cd into it:
'mkdir cdkApartmentWorkshop'
'cd cdkApartmentWorkshop'
Create a CDK Python application in your newly created directory:
'cdk init --language=python'
Once created, open up the newly created CDK app in your IDE. Here’s the project structure, and where we’ll be making the most changes in: 'cdk_apartment_workshop_stack.py'
After the init process completes and the virtualenv is created, you can use the following step to activate your virtualenv: 'source .venv/bin/activate'
If you are using a Windows platform, you would activate the virtualenv like this: '.venv\\Scripts\\activate.bat'
Once the virtualenv is activated, you can install the required dependencies. From the root directory of the project, install all dependencies in 'requirements.txt' by running the command 'pip install -r requirements.txt'
Next, open up 'app.py' (<http://app.py>) and add an 'accountId' and 'region' to your environment like so: 'env=cdk.Environment(account="132260253285", region='us-east-2')'
Here’s what my 'app.py' (<http://app.py>) looks like now:
Accessing this endpoint invokes our step functions workflow.
In this tutorial, we’ll use a lambda function to express this endpoint. Remember that we could as well go for a 'vtl template' with 'dynamodb' as the data source.
Create Lambda Function
Create a folder in your stack called 'lambda' and then, create a python file called 'start_step_function.py' and type in the following code:
So far, we’ve created an AppSync API and connected a lambda function to it. We now have to create the step functions workflow and invoke that workflow from our lambda endpoint.
We already designed the workflow in the AWS step functions visual studio. Here’s the ASL(Amazon States Language) code:
 = sf.Choice(self, "Has the Apartment been Paid ?", comment="Has the Apartment been Paid ?")
                  .when(sf.Condition.string_equals(sf.JsonPath.string_at("$.getItem.Item.id.S"), '1234567') and
                        sf.Condition.string_equals(sf.JsonPath.string_at("$.getItem.Item.status.S"), 'Paid'),
                        apartment_paid
                        )
                  .otherwise(apartment_not_paid)
The final step is to chain the states together and then instantiate our step functions workflow:
We import the 'stepfunctions' class from 'boto3' client and use it to start a step functions execution by passing in the 'StateMachineArn' we get from deploying the project, a unique name for the state machine execution and the state machine input.
Once you deploy your app, be sure to copy the step functions arn output from the command line interface.
We’ll be using it to test the workflow from AppSync.
Here’s the output from my deploy:
Testing
Log into your AWS Console and search for AppSync in the search box
Click on AWS AppSync under services and open up your AppSync project.
Click on 'Queries' on the left-hand side menu, enter a unique Id and the step functions arn you copied above, and hit the orange button above.
Go to Step functions in your AWS Console and see the execution running:
Click on the running step functions and see the workflow.
Conclusion
In this post, we built a step functions workflow using CDK as IaC, AppSync, and Python. This workflow mimics a real-life scenario of booking/reserving an apartment.
We saw how to invoke a Step functions workflow from a lambda function through an endpoint.
We saw how to convert a step functions ASL(Amazon states language) to CDK infrastructure as code(IaC)
We saw how to use IaC to create Applications with Step functions.
Major Advantages of Using IaC.
Starting up and safely tearing down your application when configuration changes can be done in a matter of minutes.
Instead of provisioning the resources of your application manually using the cloud console, IaC provides a single file that contains the entire infrastructure of your application, and you can deploy it.
IaC enables you to deploy a consistent configuration to multiple environments (dev, stage, prod).
Easily Version your infrastructure.
In the next post, we’ll see how to build this same workflow using an IaC(Infrastructure as Code) framework such as SAM(Serverless Application Model), with Python and AppSync.
At Serverless Guru, we're a collective of proactive solution finders. We prioritize genuineness, forward-thinking vision, and above all, we commit to diligently serving our members each and every day.
In the first part of this series, we built a step functions workflow for a simple apartment booking scenario using the AWS Step functions low code visual editor.
In this post, we’ll look at how to build the same workflow using CDK and python.
So while building out a bigger system(Apartment Complex Management System), I came across an interesting problem.
I’ll assume that most of us have reserved or booked either an apartment or hotel, or flight online.
For this scenario, let’s go with apartments. So when you reserve an apartment, here’s a breakdown in the simplest form of the series of steps that occur after that:
The apartment is marked as reserved, probably with a status change. Let’s say the apartment status changes from vacant to reserved.
This apartment is made unavailable for reservation by others for a particular period of time.
The client is required to make payment within that period of time.
If payment isn’t made within that time, the reservation is canceled, and the apartment status changes back from reserved to vacant.
If payment is made, then the apartment status changes from reserved to occupied/paid.
Building out this business logic using custom code is very possible but inefficient.
Why?
Because as developers, good ones for that matter, we always have to be on the lookout for tools that’ll help us carry out tasks in an efficient and scalable manner.
The series of steps outlined above serves as a good use case for AWS step functions.
The sequence of a service interaction is important
The state has to be managed with AWS service calls
Decision trees, retries, and error-handling logic are required
Solutions Architecture
Because we’d love to invoke a step function workflow from a frontend application, we’ll use AppSync to create an endpoint which we’ll call from a mobile app created with AWS Amplify and Flutter.
But for this post, we’ll end at the point where we’ve created the AppSync endpoint.
Let’s get started.
Initialize CDK app
Firstly, create a new project directory. I’m using a Mac, so I’ll create mine and cd into it:
'mkdir cdkApartmentWorkshop'
'cd cdkApartmentWorkshop'
Create a CDK Python application in your newly created directory:
'cdk init --language=python'
Once created, open up the newly created CDK app in your IDE. Here’s the project structure, and where we’ll be making the most changes in: 'cdk_apartment_workshop_stack.py'
After the init process completes and the virtualenv is created, you can use the following step to activate your virtualenv: 'source .venv/bin/activate'
If you are using a Windows platform, you would activate the virtualenv like this: '.venv\\Scripts\\activate.bat'
Once the virtualenv is activated, you can install the required dependencies. From the root directory of the project, install all dependencies in 'requirements.txt' by running the command 'pip install -r requirements.txt'
Next, open up 'app.py' (<http://app.py>) and add an 'accountId' and 'region' to your environment like so: 'env=cdk.Environment(account="132260253285", region='us-east-2')'
Here’s what my 'app.py' (<http://app.py>) looks like now:
Accessing this endpoint invokes our step functions workflow.
In this tutorial, we’ll use a lambda function to express this endpoint. Remember that we could as well go for a 'vtl template' with 'dynamodb' as the data source.
Create Lambda Function
Create a folder in your stack called 'lambda' and then, create a python file called 'start_step_function.py' and type in the following code:
So far, we’ve created an AppSync API and connected a lambda function to it. We now have to create the step functions workflow and invoke that workflow from our lambda endpoint.
We already designed the workflow in the AWS step functions visual studio. Here’s the ASL(Amazon States Language) code:
 = sf.Choice(self, "Has the Apartment been Paid ?", comment="Has the Apartment been Paid ?")
                  .when(sf.Condition.string_equals(sf.JsonPath.string_at("$.getItem.Item.id.S"), '1234567') and
                        sf.Condition.string_equals(sf.JsonPath.string_at("$.getItem.Item.status.S"), 'Paid'),
                        apartment_paid
                        )
                  .otherwise(apartment_not_paid)
The final step is to chain the states together and then instantiate our step functions workflow:
We import the 'stepfunctions' class from 'boto3' client and use it to start a step functions execution by passing in the 'StateMachineArn' we get from deploying the project, a unique name for the state machine execution and the state machine input.
Once you deploy your app, be sure to copy the step functions arn output from the command line interface.
We’ll be using it to test the workflow from AppSync.
Here’s the output from my deploy:
Testing
Log into your AWS Console and search for AppSync in the search box
Click on AWS AppSync under services and open up your AppSync project.
Click on 'Queries' on the left-hand side menu, enter a unique Id and the step functions arn you copied above, and hit the orange button above.
Go to Step functions in your AWS Console and see the execution running:
Click on the running step functions and see the workflow.
Conclusion
In this post, we built a step functions workflow using CDK as IaC, AppSync, and Python. This workflow mimics a real-life scenario of booking/reserving an apartment.
We saw how to invoke a Step functions workflow from a lambda function through an endpoint.
We saw how to convert a step functions ASL(Amazon states language) to CDK infrastructure as code(IaC)
We saw how to use IaC to create Applications with Step functions.
Major Advantages of Using IaC.
Starting up and safely tearing down your application when configuration changes can be done in a matter of minutes.
Instead of provisioning the resources of your application manually using the cloud console, IaC provides a single file that contains the entire infrastructure of your application, and you can deploy it.
IaC enables you to deploy a consistent configuration to multiple environments (dev, stage, prod).
Easily Version your infrastructure.
In the next post, we’ll see how to build this same workflow using an IaC(Infrastructure as Code) framework such as SAM(Serverless Application Model), with Python and AppSync.
Stay tuned
Rosius Ndimofor
Senior Serverless Developer
Rosius is a Senior Serverless Developer at Serverless Guru, an AWS Serverless Hero, AWS community builder, and frequent blogger.


%20(1).svg)

.svg)


