

Check out Rosius's GitHub: https://github.com/trey-rosius/sam_stepfunctions
Hey there, welcome to the 3rd Scenario in “Building a Step Functions Workflow “
In the first part of this series, we built a Step Functions workflow for a simple apartment booking scenario using the AWS Step Functions low code visual editor.
In the second part of this series, we built the same workflow using CDK as IaC, AppSync and Python, while invoking the Step Functions execution from a Lambda function.
In this post, we’ll look at how to build the same workflow, using SAM as IaC, AppSync, and Python.
Prerequisite
- Install AWS Cli (https://docs.aws.amazon.com/cli/latest/userguide/cli-chap-welcome.html)
- Install AWS SAM CLI(https://docs.aws.amazon.com/serverless-application-model/latest/developerguide/serverless-sam-cli-install.html)
- AWS Account
- Any IDE of your choice. I use PyCharm
- Install Python 3.8
Assumption
In this post, we won’t be looking at SAM basics. So I’ll assume you’ve worked with SAM before.
If I’m wrong, I apologize. Please level up with these articles:
- https://phatrabbitapps.com/building-modern-serverless-apis-with-aws-dynamodb-lambda-and-api-gatewaypart-3
- https://github.com/aws/aws-sam-cli-app-templates
Problem Statement
What are we trying to solve?
So while building out a bigger system(Apartment Complex Management System), I encountered an interesting problem.
I’ll assume that most of us have reserved or booked either an apartment or hotel, or flight online.
For this scenario, let’s go with apartments. So when you reserve an apartment, here’s a breakdown in the simplest form of the series of steps that occur after that:
- The apartment is marked as reserved, probably with a status change. Let’s say the apartment status changes from vacant to reserved.
- This apartment is made unavailable for reserving by others for a particular period of time.
- The client is required to make payment within that period of time
- If payment isn’t made within that time, the reservation is canceled, and the apartment status changes back from reserved to vacant.
- If payment is made, then apartment status changes from reserved to occupied/paid
Building out this business logic using custom code is very possible but inefficient.
Why?
Because as developers, good ones for that matter, we always have to be on the lookout for tools that’ll help us carry out tasks in an efficient and scalable manner.
The series of steps outlined above serves as a good use case for AWS Step Functions.
- The sequence of a service interaction is important
- State has to be managed with AWS service calls
- Decision trees, retries, and error handling logic are required.
Solutions Architecture
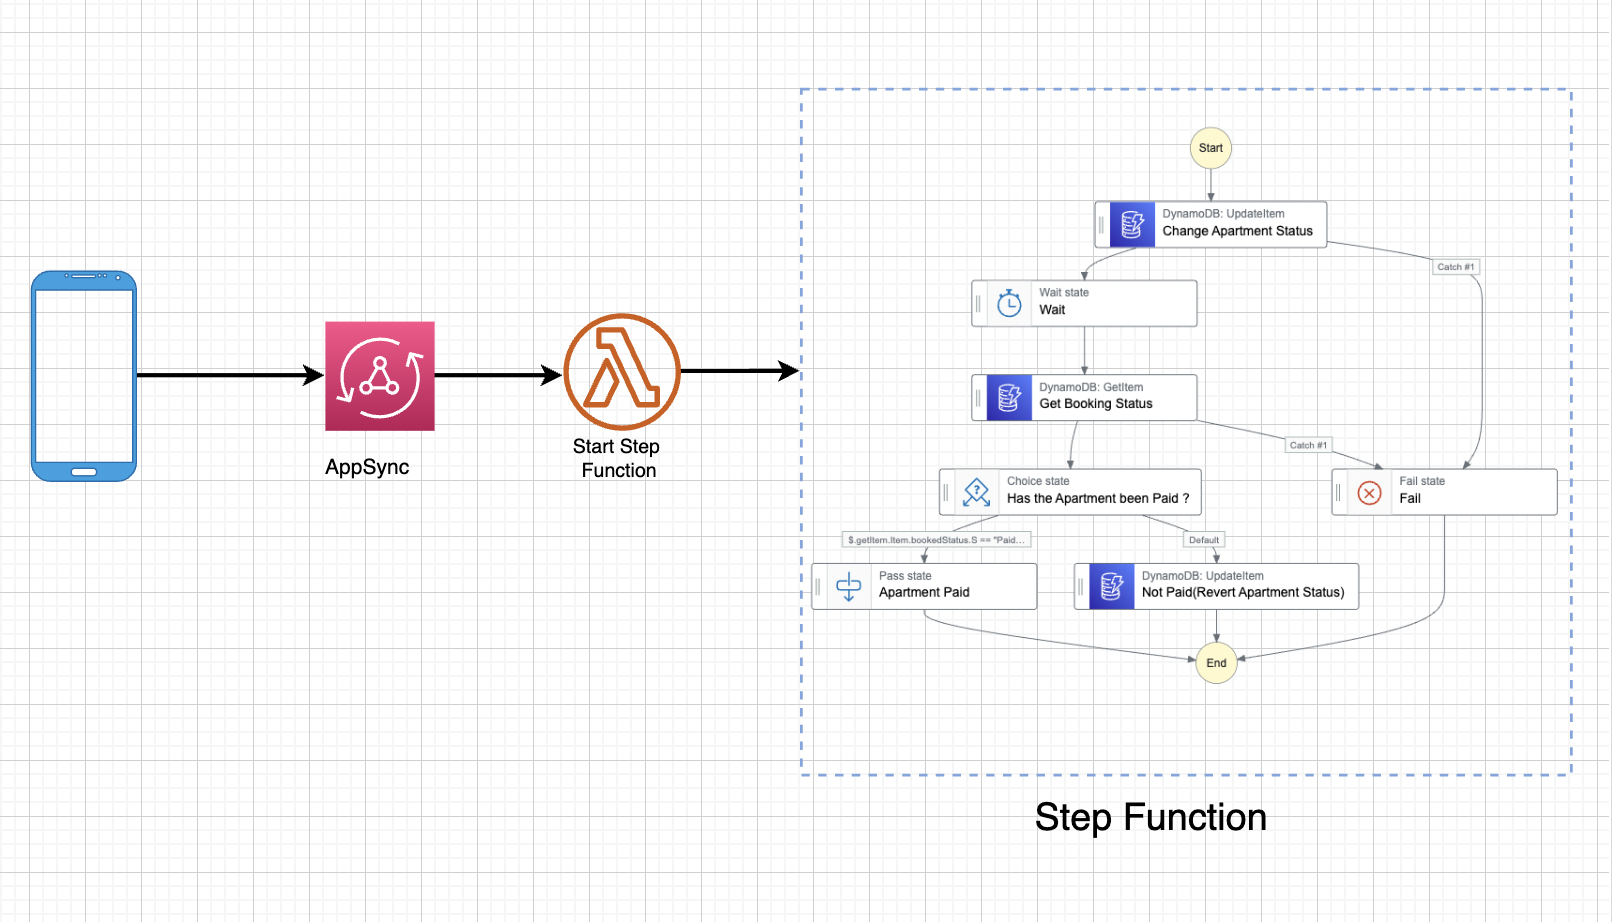
Let me quarterback this entire architecture for you, please. Here’s what’s happening:
- A frontend application sends a mutation to AppSync.
- A Lambda resolver is invoked by AppSync based on that mutation.
- Lambda gets the input from the mutation and starts a Step Functions workflow based on the input.
We’ll use Flutter and Amplify to build out the front-end application in the next tutorial.
Create And Initialize a SAM Application
Open any Terminal/Command line interface, type in the command
sam init
And then follow the instructions as seen in these screenshots:

Choose Python 3.8 as your runtime environment

I gave the project name 'samWorkshopApp'

Once your application has been created, open it up in your IDE, and let’s proceed. For reference, I’m using Pycharm.
Activate your virtualenv like this on mac or linux machines:
'source .venv/bin/activate'
If you are a Windows platform, you would activate the virtualenv like this:
'.venv\\Scripts\\activate.bat'
Once the virtualenv is activated, you can install the required dependencies.
From the root directory of the project, install all dependencies in 'requirements.txt' by running the command 'pip install -r requirements.txt'
Initially, here’s how my folder structure looks like:

There are a couple of changes we are about to make:
- Inside the 'functions' directory, delete all folders, and then create a folder called lambda.
- Delete everything inside the 'statemachine' folder, then create a file inside that same folder called `booking_step_functions.asl.json.
This file would contain the state machine definition for our workflow. We visually defined this workflow in part 1 of this series. Copy the ASL(Amazon States Language) for the workflow below and paste it inside the file we’ve created above:
{
   "Comment":"A description of my state machine",
   "StartAt":"Change Apartment Status",
   "States":{
      "Change Apartment Status":{
         "Type":"Task",
         "Resource":"arn:aws:states:::dynamodb:updateItem",
         "Parameters":{
            "TableName":"apartment_workshop_db",
            "Key":{
               "Id":{
                  "S.$":"$.input.apartmentId"
               }
            },
            "UpdateExpression":"SET #apartmentStatus = :status",
            "ExpressionAttributeNames":{
               "#apartmentStatus":"status"
            },
            "ExpressionAttributeValues":{
               ":status":{
                  "S.$":"$.input.status"
               }
            },
            "ConditionExpression":"attribute_exists(Id)"
         },
         "Catch":[
            {
               "ErrorEquals":[
                  "States.TaskFailed"
               ],
               "Comment":"Apartment Doesn't Exist",
               "Next":"Fail",
               "ResultPath":"$.error"
            }
         ],
         "Next":"Wait",
         "ResultPath":"$.updateItem"
      },
      "Wait":{
         "Type":"Wait",
         "Seconds":5,
         "Next":"Get Apartment Status"
      },
      "Get Apartment Status":{
         "Type":"Task",
         "Resource":"arn:aws:states:::dynamodb:getItem",
         "Parameters":{
            "TableName":"apartment_workshop_db",
            "Key":{
               "Id":{
                  "S.$":"$.input.apartmentId"
               }
            }
         },
         "ResultPath":"$.getItem",
         "Next":"Has Client Made Payment ?"
      },
      "Has Client Made Payment ?":{
         "Type":"Choice",
         "Choices":[
            {
               "And":[
                  {
                     "Variable":"$.getItem.Item.status.S",
                     "StringEquals":"paid"
                  },
                  {
                     "Variable":"$.getItem.Item.Id.S",
                     "StringEquals":"1234567"
                  }
               ],
               "Next":"Payment Was made."
            }
         ],
         "Default":"Payment Wasn't Made, revert."
      },
      "Payment Was made.":{
         "Type":"Pass",
         "End":true
      },
      "Payment Wasn't Made, revert.":{
         "Type":"Task",
         "Resource":"arn:aws:states:::dynamodb:updateItem",
         "Parameters":{
            "TableName":"apartment_workshop_db",
            "Key":{
               "Id":{
                  "S":"1234567"
               }
            },
            "UpdateExpression":"SET #apartmentStatus = :status",
            "ExpressionAttributeNames":{
               "#apartmentStatus":"status"
            },
            "ExpressionAttributeValues":{
               ":status":{
                  "S":"vacant"
               }
            }
         },
         "End":true
      },
      "Fail":{
         "Type":"Fail",
         "Error":"Apartment Doesn't Exist",
         "Cause":"Update Condition Failed"
      }
   }
}
Now, my folder structure looks like this:

Create GraphQL API
Remember, we have to create a GraphQL API, attach a schema and a database, and connect a Lambda resolver to it. This Lambda would be responsible for invoking the Step Functions workflow.
Open up the 'template.yaml' and add this GraphQl API and API key to the resources section
SamStepFunctionsApi:
    Type: "AWS::AppSync::GraphQLApi"
    Properties:
      Name: SamStepFunctionsApi
      AuthenticationType: "API_KEY"
      XrayEnabled: true
      LogConfig:
        CloudWatchLogsRoleArn: !GetAtt RoleAppSyncCloudWatch.Arn
        ExcludeVerboseContent: FALSE
        FieldLogLevel: ALL
We want to see a stream of logs in CloudWatch from AppSync, so let’s create and assign a CloudWatch role to the GraphQL API:
RoleAppSyncCloudWatch:
    Type: AWS::IAM::Role
    Properties:
      ManagedPolicyArns:
        - "arn:aws:iam::aws:policy/service-role/AWSAppSyncPushToCloudWatchLogs"
      AssumeRolePolicyDocument:
        Version: 2012-10-17
        Statement:
          - Effect: Allow
            Action:
              - sts:AssumeRole
            Principal:
              Service:
                - appsync.amazonaws.com
GraphQL Schema
A GraphQL API always works with a GraphQL schema. In the root directory, create a folder called ‘graphql’, and inside that folder, create a file called 'schema.graphql'. Type in the following ‘graphql’ schema into the file:
type StepFunctions {
  id: String!
  arn: String!
}
type Query {
  getStepFunctions: [ StepFunctions! ]
}
input StepFunctionsInput {
  id:ID!
  arn: String!
}
type Mutation {
  addStepFunction(input: StepFunctionsInput!): StepFunctions
}

schema {
  query: Query
  mutation: Mutation
}
This schema has a single mutation 'addStepFunction' that sends an input('id' and 'arn') to a Lambda resolver. The Lambda resolver uses this input to start a Step Functions execution. Let’s define the schema in 'templates.yaml' under resources.
SamStepFunctionsApiSchema:
    Type: "AWS::AppSync::GraphQLSchema"
    Properties:
      ApiId: !GetAtt SamStepFunctionsApi.ApiId
      DefinitionS3Location: 'graphql/schema.graphql'
Create Lambda Function
Let’s create a lambda function that we’ll attach to a data source and then attach that data source to an AppSync resolver Inside the 'functions/lambda' folder, create a file called 'app.py' and type in the following code:
import json
def lambda_handler(event, context):
    print("Lambda function invoked")
    print(json.dumps(event))
    print(json.dumps(event["arguments"]['input']))

    return {"id": event["arguments"]['input']['id'], "arn": event["arguments"]['input']['arn']}
For now, this lambda function simply takes an input('id' and 'arn') and outputs('id' and 'arn'). Later on, we’ll use this lambda function to start the Step Functions workflow.
Let’s define the Lambda function in 'template.yaml' alongside its 'role':
SamStepFunctionFunction:
    Type: AWS::Serverless::Function
    Properties:
      CodeUri: functions/lambda/
      Handler: app.lambda_handler
      Role: !GetAtt lambdaStepFunctionRole.Arn
      Runtime: python3.8
      Architectures:
        - x86_64
lambdaStepFunctionRole:
Type: AWS::IAM::Role
Properties:
AssumeRolePolicyDocument:
Version: "2012-10-17"
Statement:
- Action:
- "sts:AssumeRole"
Effect: "Allow"
Principal:
Service:
- "lambda.amazonaws.com"Lambda Datasource
For this application, we’ll be using Lambda as our data source.
Inside 'template.yaml' add the following code below resources:
SamStepFunctionDataSource:
    Type: "AWS::AppSync::DataSource"
    Properties:
      ApiId: !GetAtt SamStepFunctionsApi.ApiId
      Name: "SamStepFunctionsLambdaDirectResolver"
      Type: "AWS_LAMBDA"
      ServiceRoleArn: !GetAtt AppSyncServiceRole.Arn
      LambdaConfig:
        LambdaFunctionArn: !GetAtt SamStepFunctionFunction.Arn
Since this data source would have to call AppSync, we attach an AppSync service role to it:
AppSyncServiceRole:
    Type: "AWS::IAM::Role"
    Properties:
      AssumeRolePolicyDocument:
        Version: "2012-10-17"
        Statement:
          - Effect: "Allow"
            Principal:
              Service:
                - "appsync.amazonaws.com"
            Action:
              - "sts:AssumeRole"
Create Direct Lambda Resolver
Now, we have to create a direct Lambda resolver connecting the mutation in our schema to the Lambda data source we created above.
Under resources in 'template.yaml', type in:
CreateAddStepFunctionsResolver:
    Type: "AWS::AppSync::Resolver"
    Properties:
      ApiId: !GetAtt SamStepFunctionsApi.ApiId
      TypeName: "Mutation"
      FieldName: "addStepFunction"
      DataSourceName: !GetAtt SamStepFunctionDataSource.Name
Database
In our workflow, we save apartment attributes to a database. Let’s go ahead and create the database. It’s a DynamoDB with a single primary key of ID.
SamStepFunctionsTable:
    Type: AWS::Serverless::SimpleTable # More info about SimpleTable Resource: https://docs.aws.amazon.com/serverless-application-model/latest/developerguide/sam-resource-simpletable.html
    Properties:
      PrimaryKey:
        Name: Id
        Type: String
      ProvisionedThroughput:
        ReadCapacityUnits: 1
        WriteCapacityUnits: 1
State Machine
A couple of steps above, we saved the Step Functions workflow in a file called 'booking_step_functions.asl.json'. We have to create a state machine resource in 'template.yml', link to that file, do some variable substitutions like the DB name, and also provide DynamoDB read and write policies for the 'update' and 'get' item DynamoDB methods.
So let’s go ahead and define the step machine resource under ‘Resources’ in 'template.yml':
SamStepFunctionStateMachine:
    Type: AWS::Serverless::StateMachine # More info about State Machine Resource: https://docs.aws.amazon.com/serverless-application-model/latest/developerguide/sam-resource-statemachine.html
    Properties:
      DefinitionUri: statemachine/booking_step_function.asl.json
      DefinitionSubstitutions:
        DDBUpdateItem: !Sub arn:${AWS::Partition}:states:::dynamodb:updateItem
        DDBGetItem: !Sub arn:${AWS::Partition}:states:::dynamodb:getItem
        DDBTable: !Ref SamStepFunctionsTable

      Policies: # Find out more about SAM policy templates: https://docs.aws.amazon.com/serverless-application-model/latest/developerguide/serverless-policy-templates.html
        - DynamoDBWritePolicy:
            TableName: !Ref SamStepFunctionsTable
        - DynamoDBReadPolicy:
            TableName: !Ref SamStepFunctionsTable
After all variable substitutions, the 'booking_step_function.asl.json' file looks like this now:
{
   "Comment":"This state machine updates the status of a booked transaction in the DB, waits for payment to be made and then updates again or passes",
   "StartAt":"Change Apartment Status",
   "States":{
      "Change Apartment Status":{
         "Type":"Task",
         "Resource":"${DDBUpdateItem}",
         "Parameters":{
            "TableName":"${DDBTable}",
            "Key":{
               "Id":{
                  "S.$":"$.details.accountId"
               }
            },
            "ConditionExpression":"attribute_exists(Id)",
            "UpdateExpression":"SET bookedStatus = :bookedStatus",
            "ExpressionAttributeValues":{
               ":bookedStatus":{
                  "S.$":"$.details.bookedStatus"
               }
            }
         },
         "Next":"Wait",
         "ResultPath":"$.updateResult",
         "Catch":[
            {
               "ErrorEquals":[
                  "States.ALL"
               ],
               "Comment":"Items Doesn't Exist",
               "Next":"Fail",
               "ResultPath":"$.updateError"
            }
         ]
      },
      "Wait":{
         "Type":"Wait",
         "Seconds":60,
         "Next":"Get Booking Status"
      },
      "Get Booking Status":{
         "Type":"Task",
         "Resource":"${DDBGetItem}",
         "Parameters":{
            "TableName":"${DDBTable}",
            "Key":{
               "id":{
                  "S.$":"$.details.accountId"
               }
            }
         },
         "Next":"Has the Apartment been Paid ?",
         "ResultPath":"$.getItem",
         "Catch":[
            {
               "ErrorEquals":[
                  "States.ALL"
               ],
               "Comment":"Couldn't find item",
               "Next":"Fail"
            }
         ]
      },
      "Has the Apartment been Paid ?":{
         "Type":"Choice",
         "Choices":[
            {
               "And":[
                  {
                     "Variable":"$.getItem.Item.Id.S",
                     "StringEquals":"1234567"
                  },
                  {
                     "Variable":"$.getItem.Item.bookedStatus.S",
                     "StringEquals":"Paid"
                  }
               ],
               "Next":"Apartment Paid"
            }
         ],
         "Default":"Not Paid(Revert Apartment Status)"
      },
      "Not Paid(Revert Apartment Status)":{
         "Type":"Task",
         "Resource":"${DDBUpdateItem}",
         "Parameters":{
            "TableName":"${DDBTable}",
            "Key":{
               "Id":{
                  "S.$":"$.getItem.Item.Id.S"
               }
            },
            "UpdateExpression":"SET bookedStatus = :bookedStatus",
            "ExpressionAttributeValues":{
               ":bookedStatus":{
                  "S":"PENDING"
               }
            }
         },
         "End":true,
         "ResultPath":"$.notPaid"
      },
      "Fail":{
         "Type":"Fail"
      },
      "Apartment Paid":{
         "End":true,
         "Type":"Pass"
      }
   }
}
Please Grab the complete code HERE.
Invoke Step Functions From Lambda
Navigate to 'functions/lambda/app.py' and type in this code:
import json
import boto3

step_function_client = boto3.client("stepfunctions")


def lambda_handler(event, context):
    print("Lambda function invoked")
    print(json.dumps(event))
    print(json.dumps(event["arguments"]['input']))
    step_function_client.start_execution(
        stateMachineArn=event["arguments"]['input']['arn'],
        name=event["arguments"]['input']['id'],
        input= "{\"details\":{\"accountId\":\"1234567\",\"bookedStatus\":\"Booked\"}}",

    )

    return {"id": event["arguments"]['input']['id'], "arn": event["arguments"]['input']['arn']}
We import the Step Functions class from the boto3 client and use it to start a Step Functions execution by passing in the StateMachineArn we get from deploying the project, a unique name for the state machine execution, and the state machine input.
Deploy
Deploy the app to your AWS account using 'sam build' and 'sam deploy'
Once deployment is successful, grab the Step Functions arn and proceed to testing in AppSync.
Testing
Sign in to your AWS console and search for AppSync. Open up AppSync and click on your newly deployed AppSync project.


Conclusion
In this post, we built a Step Functions workflow using Appsync, SAM, and Python. This workflow mimics a real-life scenario of booking/reserving an apartment.
- We saw how to invoke Step Functions from a Lambda.
- We covered defining a state machine in a yaml file with variable substitution.
- We broke down how to use IaC to create Applications with Step Functions.
In the next post, we’ll invoke the Step Functions workflow from a mobile frontend application built with amplify and flutter. Stay tuned!
More Screenshots


%20(1).svg)

.svg)


