Alibaba Cloud now ranks third in the global market share after AWS & Azure. They have been growing steadily at a respectable pace and are improving their cloud offerings as they move forward.
Let’s look at a simple image compression tutorial that uses the Serverless (SLS) framework for setting up a bucket (Object Storage Service-OSS) as the trigger to the Function Compute (FC) service.
The function picks up any image (.png/.jpg) uploaded into the bucket and compresses it by calling a third party API (tinify) that does the lossy compression.
Overview of Steps:
- Setup a billing account with Alibaba.
- Enable services for use.
- Create user and accesskey.
- Obtain tinify access key
- Installing the Serverless framework.
- Setup the function code logic & create a bucket.
- Deploy.
- Test upload to the bucket.
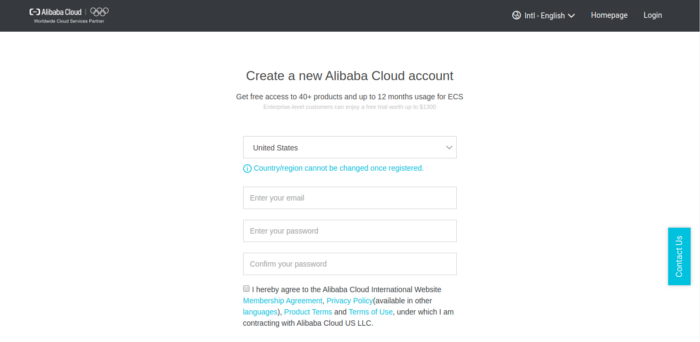
Billing Account Setup:
Create an account with Alibaba Cloud by following the on-screen instructions. Follow this. (Tip: Set the region to anything else except China to avoid Real Name verification) You will have to enter a payment method and consequently verify it.
Enable Services for Use:
Before you can start utilizing any of the services you will need to manually go to each service dashboard via the console and enable them. Without doing this you will not be able to deploy via the Serverless framework even if the permissions for using those services are in place.
Services that you will need to enable for this tutorial:
Navigate to each service from the console.
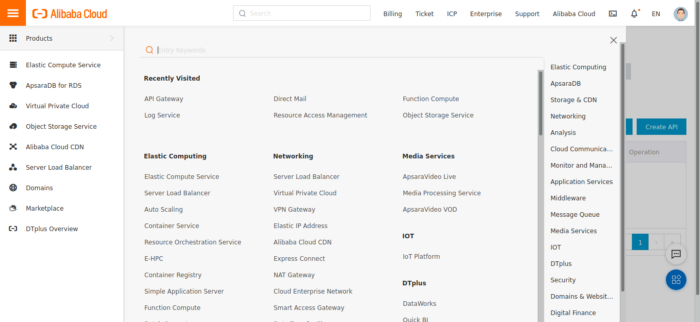
You will then be shown an activation screen for each service that you navigate to for the first time. Hit the button and you are good to go!
Create a User and Provide Access Key:
The next step is to create the user and the access key so the Serverless framework can deploy and manage the service.
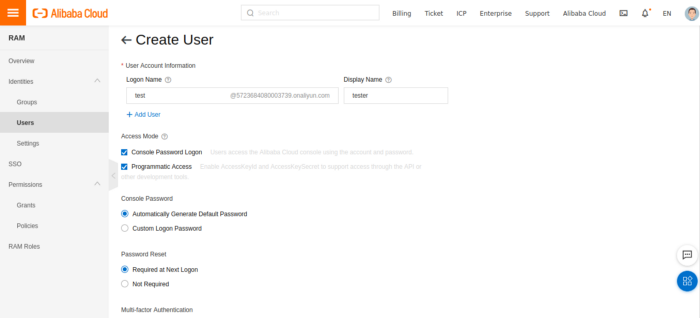
Ensure to check the programmatic access box to allow the accesskey to support calling APIs via the command line interface. The AccessKeyId and AccessKeySecret of the user will be shown on the next screen. Save the CSV file by clicking the button.
Next, attach the policies to the user. There are 4 policies that need to be linked.
- AliyunOSSFullAccess
- AliyunRAMFullAccess
- AliyunLogFullAccess
- AliyunFCFullAccess
Get the Tinify API Key:
Tinify is a third party service that performs image compression. Supports all the popular languages. In addition to image compression, it allows image resizing and smart cropping.
Provide your email address and the API key will be sent. The first 500 images per month are free.
Install the Serverless Framework:
Serverless is a Node.js CLI tool so the first thing you need to do is to install Node.js on your machine. Go to the official Node.js website, download and follow the installation instructions to install Node.js on your local machine.
- Once done, run the command: npm install -g serverless
- Run serverless — version to verify the installation.
- Install the Alibaba Function Compute Plugin: serverless plugin install — name serverless-aliyun-function-compute
- Create a new service with aliyun-nodejs template.
- serverless create — template aliyun-nodejs — path my-service
- cd my-service
- npm install -To install the dependencies.
- npm install ali-oss -To install the ali-oss module
- npm install tinify -To install tinify
- Create a file credentials and store it in the root of your directory (or any secure location). The credentials file should look like this
[default]
aliyun_access_key_secret = <collected in user creation step>
aliyun_access_key_id = <collected in user creation step>
aliyun_account_id = <Go to the Security Settings page to get the Account ID of your Alibaba Cloud account>- After creating a service with Serverless you get two files: index.js, serverless.yml.
- Each service configuration is managed in the serverless.yml file. The main responsibilities of this file are:
— Declaring a Serverless service.
— Defining one or more functions in the service.
— Defining the provider the service will be deployed to (and the runtime if provided).
— Defining any custom plugins.
— Defining events that trigger each function to execute (e.g. HTTP requests).
— Allowing events listed in the events section to automatically create the resources required for the event upon deployment.
— Allowing flexible configuration using Serverless Variables.
- In serverless.yml, update the credentials path to your file which is under the provider section.
Setting Up the Code & Bucket Creation:
For our tutorial, the serverless.yml file looks like this
service: myslsfunction # Your service name which you entered with sls create command

provider:
 name: aliyun
 runtime: nodejs8
 region: <YOUR REGION>
 credentials: /credentials # path must be absolute

plugins:
 - serverless-aliyun-function-compute

package:
 exclude:
   - package-lock.json
   - .gitignore
   - .git/**

functions:
 Objectevent:  # name of your Function
   handler: index.osseventtrigger  #name of the exported function
   events:
     - oss:
         sourceArn: acs:oss:<REGION NAME>:<ACCOUNTID>:<BUCKETNAME>
         triggerConfig:
           events:
             - oss:ObjectCreated:*
           filter:
             key:
prefix: source/- The handler property should be the function name you’ve exported in your entry point file.
- When you e.g. export a function with the name “osseventtrigger” in index.js, your handler should be handler: index.osseventtrigger.
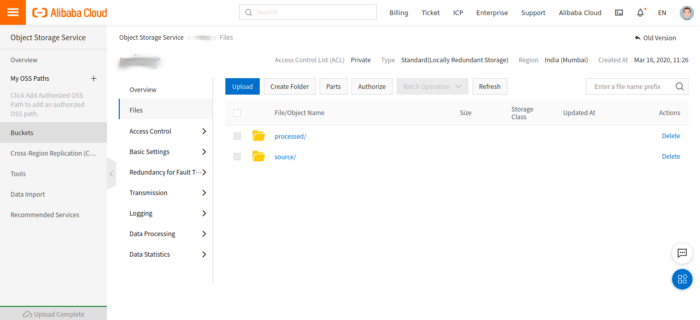
- Create an OSS bucket from the console. Be sure to create the bucket in the same region as the given under the provider section of serverless.yml.
- In index.js, the code for the Function Compute service to execute is as below.
'use strict';
console.log('Loading function ...');
const oss = require('ali-oss');
const tinify = require('tinify');
tinify.key = "<YOUR API KEY>";
exports.osseventtrigger = function (eventBuf, ctx, callback) {
   console.log('Received event:', eventBuf.toString());
   var event = JSON.parse(eventBuf);
   var ossEvent = event.events[0];
   // Required by OSS sdk: OSS region is prefixed with "oss-", e.g. "oss-cn-shanghai"
   var ossRegion = "oss-" + ossEvent.region;
   // Create oss client.
   var client = new oss({
       region: ossRegion,
       // Credentials can be retrieved from context
       accessKeyId: ctx.credentials.accessKeyId,
       accessKeySecret: ctx.credentials.accessKeySecret,
       stsToken: ctx.credentials.securityToken
   });
   // Bucket name is from OSS event
   client.useBucket(ossEvent.oss.bucket.name);
   // Processed images will be saved to processed/
   var newKey = ossEvent.oss.object.key.replace("source/", "processed/");
   // Get object
   console.log('Getting object: ', ossEvent.oss.object.key)
   client.get(ossEvent.oss.object.key).then(function (val) {
       console.log(ossEvent.oss.object.key)
       // Read object from buffer
       // Call tinify API to compress the image
       tinify.fromBuffer(val.content).toBuffer(function (err, resultData) {
           if (err) {
               console.error("Failed to resize");
               callback(err);
               return;
           }
           // Putting object back to OSS with the new key
           console.log('Putting object: ', newKey);
           client.put(newKey, resultData).then(function (val) {
               console.log('Put object:', val);
               callback(null, val);
               return;
           }).catch(function (err) {
               console.error('Failed to put object: %j', err);
               callback(err);
               return
           });
       });
   }).catch(function (err) {
       console.error('Failed to get object: %j', err);
       callback(err);
       return
   });
};
Deployment:
With everything in place, run serverless deploy or sls deploy. The SLS framework does all the heavy lifting of setting up the function and its triggers.
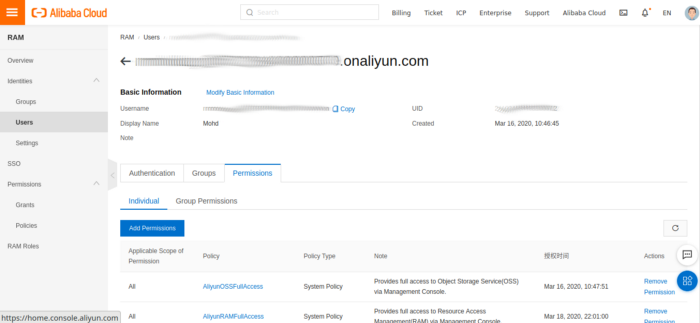
After a successful deployment, navigate to the RAM dashboard via the console. Under RAM roles, you will see two roles that were set up by the SLS framework, an execution role and an invocation role.
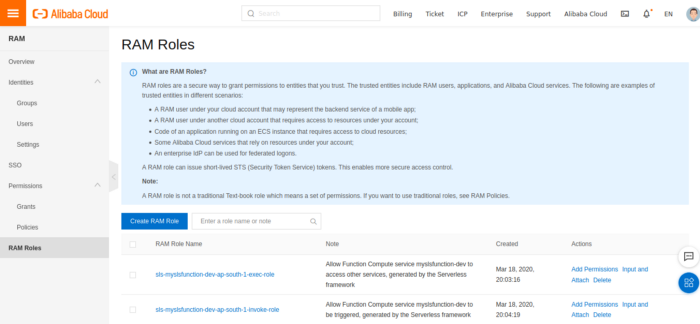
Navigate to each of these roles and attach the AliyunOSSFullAccess policy. This policy provides access to the function for accessing the bucket which we previously created.
Testing the Function:
Create a source directory inside the bucket which you created previously. Upload an image (.png/.jpg extensions only). Within seconds you will see the processed directory containing the compressed files.
In case of any errors, you can navigate to the Log Service and see where things are going wrong for the deployed function.
Feel free to reach out to us if you have any questions!


%20(1).svg)

.svg)