Tencent is one of China’s major players in the cloud computing business. Like every global cloud provider, Tencent also has its own serverless product implementation, Serverless Cloud Functions (SCF). We’ll explore a short tutorial on setting up a cloud function with the Serverless framework.
We will look at using an HTTP API with query string parameters that will be the trigger to invoke the serverless function. The function on invocation takes those parameters and creates a JSON file uploaded to a Cloud Object Service (COS) bucket.
Overview of Steps
- Account Setup
- Installing the Serverless Framework
- Function Code Setup
- Deploying to Function Service
- Testing
Account Setup
Sign up on their website. Follow their on-screen instructions and everything should be smooth sailing from thereon.

Post-sign-up, the first and foremost thing to do is get your real name verification done (this could take a day or two to complete). You can start the verification by navigating to the ‘Account Information’ from the top right dropdown. Though this step is for users in the Mainland China region, when you deploy via the Serverless (SLS) framework, Tencent throws an error requiring this verification to be done.
After being verified, do the following.
- Go to SCF and COS dashboards via the console to “activate” them for use. A service role for SCF will be created for you automatically.
- Navigate to Cloud Access Management (CAM) to create a user and it’s access keys.
- For now, you can provide administrator access to the created user, but the best practice is to limit access to only those resources that the user is supposed to work with.
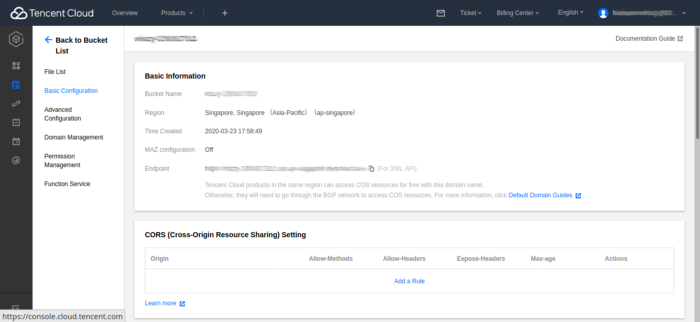
- We will also need a bucket for this tutorial, so head from the created user login to the console and make your way to the COS dashboard. Create a bucket, and note the name of the bucket and the region.
Installing the Serverless Framework
Ensure that you have node 6.x or later installed. Then run the following command:
npm install serverless -g
Now you can use the serverless framework to create a project from one of the pre-configured templates that the framework provides.
serverless create --template tencent-nodejs --path tencentsample
Now we can cd into tencentsample directory and run npm install. This command is used to install the dependencies of the project.
cd tencentsample
npm install
Next run npm install cos-nodejs-sdk-v5. This dependency allows us to perform operations on the bucket which is needed for this tutorial.
npm install cos-nodejs-sdk-v5
Let’s take a quick look into the directory will show two files serverless.yml and index.js.
serverless.yml
- Declare a Serverless service
- Define one or more functions in the service
- Define the provider the service will be deployed to (and the runtime if provided)
- Define any custom plugins to be used
- Define events that trigger each function to execute (e.g. HTTP requests)
- Allow events listed in the events section to automatically create the resources required for the event upon deployment
index.js
The index.js is the file that contains the code that is to be executed by the function service.
The framework needs access to the cloud for deploying your code. To do this we need to provide a credentials file (name of the file can be anything).
touch credentials
With the following structure:
[default]
tencent_appid = <APPID CAN BE OBTAINED FROM ACT INFORMATION PAGE>
tencent_secret_id = <YOUR USER’S API KEY>
tencent_secret_key = <YOUR USER’S SECRET KEY>
Store the credentials file in the root of the project directory.
Code Setup for the Function
With the framework and our base directory structure in place, all that is left to do is get our code into index.js, and configure the serverless.yml file to deploy our http trigger for the function. Let’s get to it by altering the files accordingly.
Within the index.js file replace its contents with the following code.
'use strict'
/**************************************************
Nodejs8.9-Apigateway
***************************************************/
const COS = require('cos-nodejs-sdk-v5')
const APPID = '<APPID>' // Replace it with your Appid,
const SECRET_ID = '<ACCESSKEY>' // Replace it with your SecretId,
const SECRET_KEY = '<SECRETKEY>' // Replace it with your SecretKey,
const REGION = '<REGION>' // Replace it with your bucket's region,
const BUCKET = `<BUCKETNAME>-${APPID}`
// Initialize cosSDK
const cosInst = new COS({
  SecretId: SECRET_ID,
  SecretKey: SECRET_KEY,
  Timeout: 45000
})
// cos SDK doesn't support use of promises/async,await. As a work around we do this.
cosInst.getPromise = function (params) {
    return new Promise((resolve, reject) => {
        cosInst.putObject(params, function (err, data) {
            if (err) {
                reject(err)
            } else {
                console.log(data)
                resolve(data)
            }
        })
    })
}
exports.queryjson = async (event, context, callback) => {
  console.log('start main handler')
// This array variable is only to implement the promise since cos SDK doesn't support it
  let promiseArr = []
let keys = Object.keys(event['queryString']); // Get keys of the URL params
  console.log(keys)
  const validate_keys = ['first_name', 'last_name'] // Only first name & last name are allowed in the query string
  let isValidKey = keys.every((key) => validate_keys.includes(key)) //Verify if the keys received are valid
  console.log(isValidKey)
  let body = {}
if (isValidKey && keys.length > 0) {
keys.forEach(key => {
        body[key] = event['queryString'][key]
    })
    console.log(body)
promiseArr.push(
        cosInst
            .getPromise({
                    Bucket: BUCKET,
                    Region: REGION,
                    Key: 'name.json', // Name of the file to be stored in the bucket
                    StorageClass: 'STANDARD',
                    Body: Buffer.from(JSON.stringify(body)), // Uploading file object
                    onProgress: function (progressData) {
                        console.log(JSON.stringify(progressData));
                    }
                })
            .then((res) => {
               console.log(res)
            })
            .catch(e => {
                throw (
                    `Error message: ${JSON.stringify(e)}`
                )
            }))
try {
        await Promise.all(promiseArr)
        return {
      isBase64: false,
      statusCode: 200,
      headers: { 'Content-Type': 'text', 'Access-Control-Allow-Origin': '*' },
      body: "File uploaded"
    }
    } catch (e) {
        console.log(e)
        return {
      isBase64: false,
      statusCode: 500,
      headers: { 'Content-Type': 'text', 'Access-Control-Allow-Origin': '*' },
      body: e
    }
    }
} else {
    return {
      isBase64: false,
      statusCode: 404,
      headers: { 'Content-Type': 'text', 'Access-Control-Allow-Origin': '*' },
      body: "Invalid keys. Enter first_name or last_name in the query params"
    }
  }
}
Your serverless.yml file will look something like this.
service: tencentscf
provider: # provider information
  name: tencent
  runtime: Nodejs8.9 # Nodejs8.9 or Nodejs6.10
  credentials: ./credentials // path to your credentials file
  region: ap-singapore //Replace with your region
  role: SCF_QcsRole
  timeout: 10 //Invocation time in seconds
# you can overwrite defaults here
#  stage: dev
#  cosBucket: DEFAULT
#  role: QCS_SCFExcuteRole
#  memorySize: 256
#  timeout: 10
#  region: ap-shanghai
#  environment:
#    variables:
#      ENV_FIRST: env1
#      ENV_SECOND: env2
#  vpcConfig:
#    vpcId: test
#    subnetId: test
plugins:
  - serverless-tencent-scf
functions:
  httpFunction: //give your desired function name
    handler: index.queryjson // filename.functionName = handler
    events:
     - apigw:
         name: jsoncreator //name of the API
         parameters:
           stageName: test
           serviceId:
           httpMethod: ANY
Deployment
Run serverless deploy or sls deploy from within the project directory. The Serverless framework will deploy the function and set up the http trigger for you. Also, if there is a need to redeploy edited code, run serverless deploy function --function <your function name> as opposed to running sls deploy because we only want to update the code and not instantiate full-blown infrastructure provisioning.
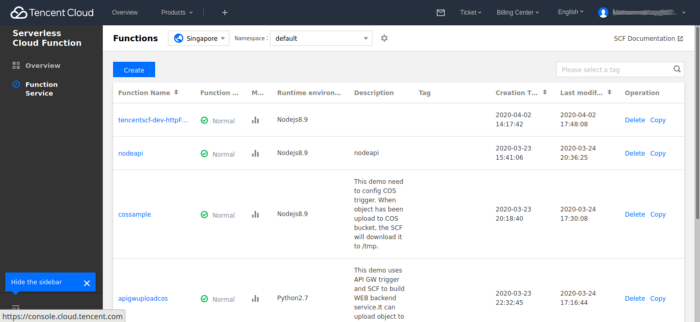
On visiting the SCF dashboard you should see the function setup and ready to run.
Testing
Copy the URL (the API trigger) from the terminal where you ran the deploy command and paste into the browser. Add the query parameters like this:
https://service-XXXXXXX-<APPID>.sg.apigw.tencentcs.com/<API-GW STAGE NAME>/tencentscf-dev-<YOUR FUNCTION NAME>?first_name=hello&last_name=world.
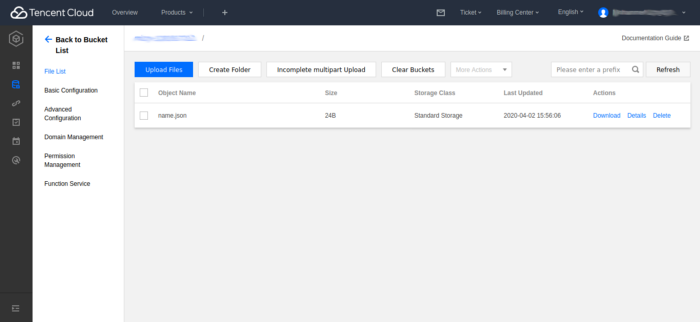
After hitting the API you should see a file named name.json being created in your bucket with the query parameters inside it.
We have now seen how the Serverless framework makes the process of developing Serverless functions on Tencent Cloud simple and straightforward. Your time is better utilized by focussing on developing the function, without having to worry about what’s going on in the background of the platform.


%20(1).svg)

.svg)