

Let’s learn how to deploy a Flask app with AWS S3
If you’re a python developer looking to quickly and easily host a website, you might be frustrated with the common misconception that you need to set up an EC2 to host a Flask app and manage that. You just want to put your blog or some documentation up, not be a Linux admin. With very little effort or config and the use of a module called Frozen-Flask, you can have a static site generated from your Flask app and hosted on S3 in less than 10 minutes.
Assumptions:
- python, pip, virtualenv, and Flask are installed
- AWS CLI is configured
- AWS Console Access with S3 access, including GetBucketPolicy and PutBucketPolicy
Initial Setup
Create a directory for your project if you don’t have one:
Create an app.py file:
A most basic example:
Copy the following into the app.py file:
Copy the following into the frozen.py file:
Install Frozen-Flask
Run the freezing script:
It makes a build folder in the directory.
AWS Setup
Log in to the AWS Console and navigate to AWS S3. Then create a bucket in S3. I used serverless-guru-flask-s3.
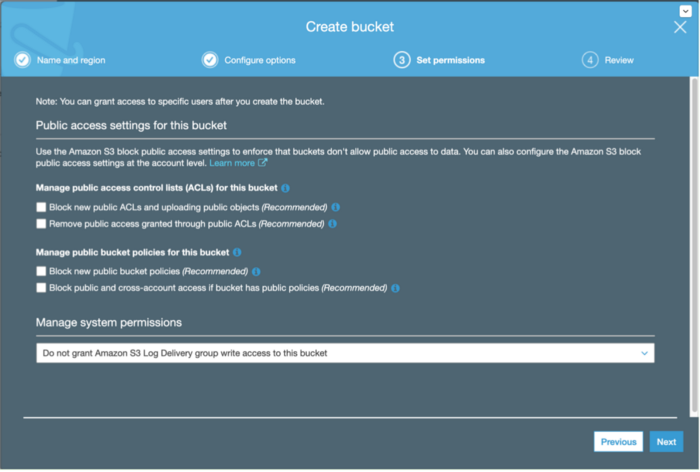
On page 3 when setting the bucket up (the Set permissions page) you will need to untick the 4 checkboxes or you will not be able to set the bucket policy in later steps. If you forget to do this step, you will be able to edit them later in Permissions > Public access settings.
Click on the bucket you created in the list, then click the Properties tab. In that tab, click on Static website hosting and select Use this bucket to host a website. For Index document use index.html — this is what Frozen-Flask will generate as the root document. Now go to the Permissions tab and click on Bucket Policy. In the text box, put the following (replace $BUCKET_NAME with the name of your bucket:
Save this, go back to the properties tab and copy the website URL from the Static website hosting selection. For reference, static website URLs in S3 follow a format:
So, in my case, it would be http://serverless-guru-flask-s3.s3-website-us-west-2.amazonaws.com/.
Go back to our app directory and upload your files to S3 with the AWS CLI with the following command, replacing BUCKET_NAME with your bucket name:
Now if you open your URL in your browser, you should get your page. I filled in some Lorem Ipsum text for this screenshot.


%20(1).svg)

.svg)


