
Introduction
In a typical e-commerce application, a user browses through a catalog of products, chooses some products, and then proceeds to checkout. In the checkout process, the user needs to pay for the selected products. Once the payment process is completed, some post-payment activities need to be executed in order to process the order and the products that the user paid for.
These “post-payment” activities usually refer to tasks that may need to be performed in a particular sequence, but at the same time, some other tasks may be performed in parallel. There is also the need to do error handling.
For this use case, a powerful pattern is to use an orchestrator service that handles all the activities in a streamlined way. Using AWS Step Functions is a great way to orchestrate these tasks.
Let’s dive into an example use case, along with some high-level requirements, and showcase a couple of features and a combination of services.
Requirements
Let’s imagine a typical e-commerce application, where a user can browse through different products, add them to some sort of “shopping basket” and then, once it’s satisfied, can continue with the payment process. After the payment process is done, there are some activities that the e-commerce system must perform, like updating the inventory of the products, sending an order with enough details to a fulfillment center, sending the customer a notification with order details, arrival date, etc. This article will focus on the “post-payment” activities, which, in a typical e-commerce site, come after the payment process is finished. The following is a sample of what some requirements could look like for building such an “feature”:
- After the user finishes payment, a “post-payment activities” process must be triggered
- The “post-payment activities” process should do the following:
- Verify that payment was completed successfully
- If payment was not completed successfully, send a general error notification to the user and don’t continue with the rest of the flow
- Upon successful payment verification, initiate the following tasks in parallel for order processing. Products need to be grouped by fulfillment center and then, for each product group, do the following:
- Update inventory system
- Send order details to the fulfillment center
- After both tasks are completed, perform the following tasks:
- Send a confirmation email to the customer with details about the order, arrival date, etc
- Update the customer’s order history with the new order
- Each step must handle errors gracefully. If an error happens in one of the tasks:
- Log the error for manual review and send a notification email to the customer support team
- Verify that payment was completed successfully
A high-level diagram of the system is shown below:
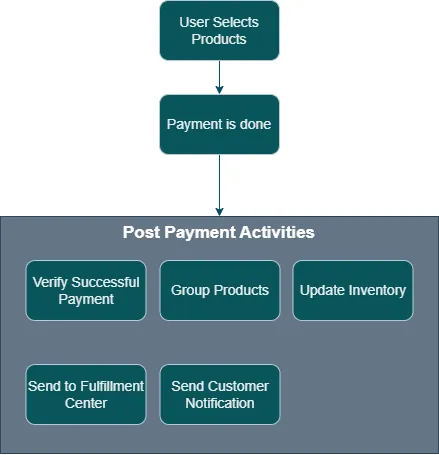
Notice that the image only shows the functional tasks. Other tasks like error handling are technical aspects that need to be taken into account in the solution.
The Solution
The solution to meet the requirements should involve a way to sequence different separate processes. Looking at the requirements, we can simplify the solution to a system that is capable of sequencing the different tasks in a particular order, while at the same time handling parallel steps and error handling. In this case, a simplified flowchart of the solution could look like the following image
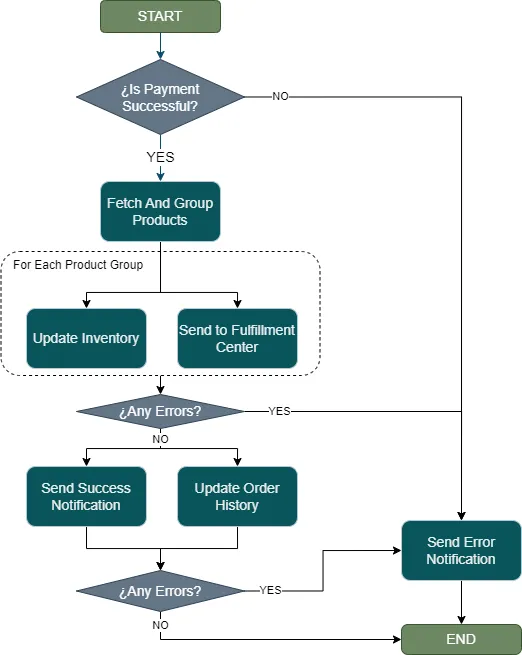
As we can see in the flowchart image, the post-payment activities can be arranged in a specific sequence, with error handling in between steps. We can also leverage parallel processing where we can in a way that makes sense and also follows the requirements. Notice also that this flowchart is agnostic of underlying technology/service. While this article wants to highlight the benefits of step functions, while making an architecture decision it’s important to consider other solutions and proposals. Let’s take a look at two possible solutions involving two different patterns, along with its pros and cons:
Orchestrator Pattern
An “Orchestrator” is a central control unit which is responsible for sequencing different processes. Much like the conductor in an orchestra, it dictates the flow of operations and ensures that each piece plays at the correct time. The “orchestrator” is responsible for initiating processes, coordinating inter-process communication, handling failures and ensuring the workflow goes smoothly. This creates a system that allows for easier monitoring and managing complex workflows
Choreographer Pattern
The “Choreographer” is a decentralization pattern. There is no single entity which controls the sequence of the processes. Instead, each individual process knows which other process is next for execution after its own completion, and when to do so. This is accomplished by writing and reading messages. Each process emits messages after finishing, which gets picked up by other processes. This creates a loosely coupled system where individual processes only need to understand messages they care about.
Comparison
While both patterns can help build a system that handles the requirements, choosing the orchestrator pattern offers a centralized way to handle processes, allowing easier error handling and even recovery if needed. Monitoring and observability are also simplified, which facilitates troubleshooting.
AWS Step Functions
AWS Step Functions is a serverless orchestrator service that streamlines a particular workflow into a set of states. It excels in handling complex workflows that have multiple steps and sequencing those steps. At the same time, it’s great for handling errors, parallel processing, and integrating with other AWS services. One great benefit of it is its ability to visually represent and edit the workflow through the aws console, which also lets you execute it and see each step’s inputs and outputs clearly.
Given the nature of the requirements of implementing the logic for completing the tasks in a particular sequence, and the requirement to handle errors, choosing AWS Step Functions to act as an orchestrator is a natural solution.
Building this solution using AWS Step Functions is possible through the AWS console. While it’s a great tool to visually build the step function workflow and execute it to debug it, it can also help in exporting the JSON that corresponds to the workflow steps and configuration. This way it’s possible to paste the JSON in a Cloudformation template to deploy the step function through Infrastructure as Code tools like CloudFormation.
Assumptions
In order to keep this article from getting too complex, let’s make a couple of assumptions regarding the following points:
- How the data looks after finishing the payment process
- How data is related between the customer’s chosen products, payment and the input to start the post-payment activities
- Simplify inventory management to a DynamoDB update
- Simplify how to send products to fulfillment centers (invoke a Lambda function)
- Simplify how to send notifications to customers (send a message to an SNS topic)
- Simplify how to send notifications to the customer support team (send a message to an SNS topic)
With this in mind, let’s explore a bit on how the data looks like before jumping into the actual implementation.
Customer Session
In order to simplify the way the data is handled, let’s make the following simplified data modeling in order to cover the customer’s chosen products and payment status. Before sending for payment, let’s imagine a “session” gets generated. This session contains the following information:
- Chosen products
- Payment Status
Let’s also assume that this data gets stored in a simple DynamoDb Table that uses a SessionId (uuid) as the primary key to identify the payment session of each customer. Some sample data modeling might look like the following:
Table name: CustomerPaymentSession
- SessionId (PK):
String - CustomerId:
String - PaymentStatus:
String - Products:
List
Let’s also make an assumption that each product has the following structure:
- fulfillmentCenterId:
String - id:
String - name:
String - price:
Number - quantity:
Number
As so, an example of a “customer session” may look like the following:
Sample Implementation
When using the AWS console and the workflow studio, we can do a simple implementation. With the help of the assumptions and the previous analysis, the result would look like the following:
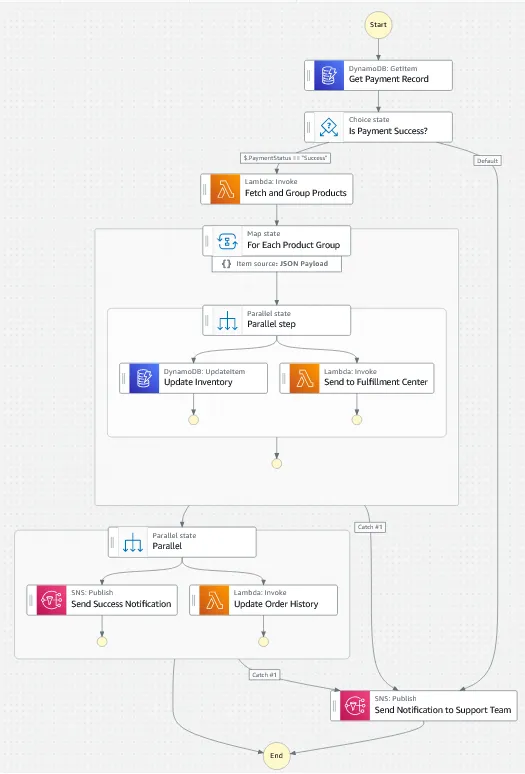
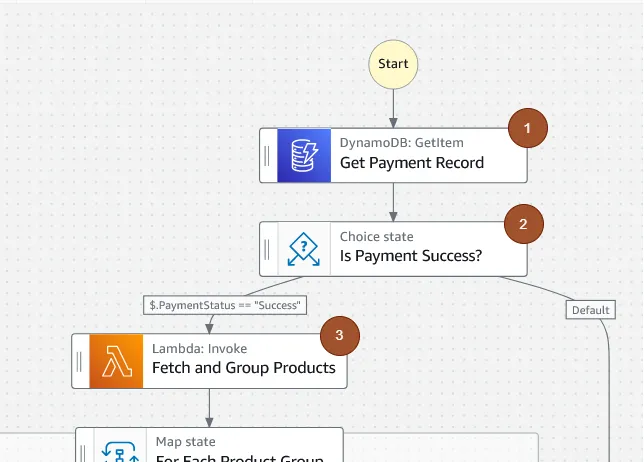
Let’s zoom in to cover each part and explain more clearly:
Data Flow
Here we have the start of the step function workflow, the verification of the payment status and a Lambda function that fetches and groups products to continue with the flow.
1. In the first step, we get the input used to invoke the step function. According to the assumptions and the simplified data model, the step function should be initiated with the SessionId parameter, as is the primary key to the “CustomerPaymentSession” DynamoDb Table, which holds the customer’s products and payment result:
With this input, we can fetch the payment record with the given SessionId and check if payment was executed successfully. The most suited dynamodb operation in this case is a “GetItem”, which is declared and configured in the step function itself:
Notice the usage of $. When referencing a value in the input, we use the $ at the end of the field name, then the value starts with the sign followed by the field name we want to reference. In this case, the input contains SessionId, so we reference it using $.SessionId. Similarly, we can map the output of the DynamoDB operation using the Step Functions “Transform result” feature, which lets us reference values in the result and map them in a way that makes sense. In this case, we can configure the following mapping:
An example output of this step would be the following:
2. In this step, we need to verify the payment status given by DynamoDB in the previous step. We can make use of a “Choice State” from Step Functions, which takes an input and evaluates it against certain conditions to determine the next step. For our use case, we only care that PaymentStatus is exactly Success. We can do so like in the Step Functions configuration shown below:

3. For Step 3, We need to fetch and group products so that they can be processed in groups and can be sent to fulfillment center in groups. As shown in previous steps, the data for each product has a fulfillmentCenterId. For simplicity of this article, let’s imagine a Lambda function takes care of this task, and returns the grouped products by fulfillmentCenterId, as shown below:
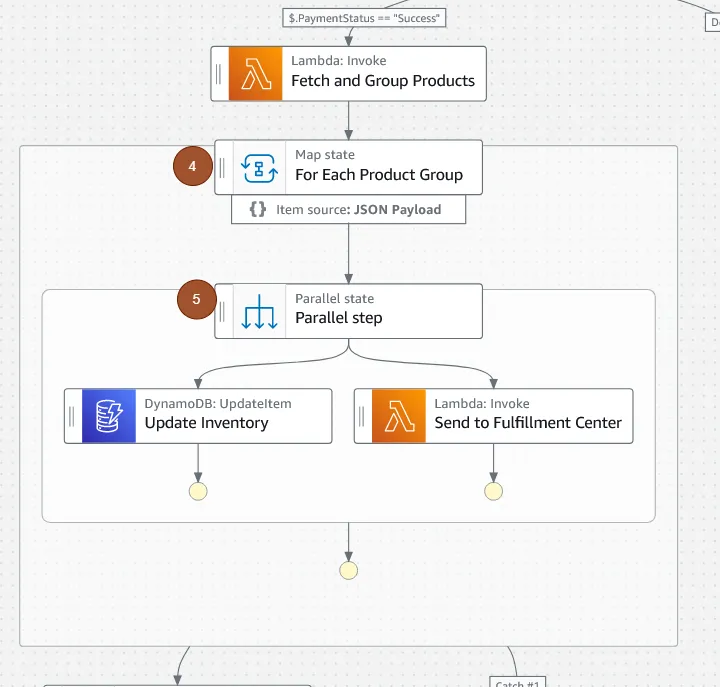
4. Step 4 receives the grouped products array as input. Since we need to loop through each product group, we can use the Step Function’s “Map state” to do so. We just specify the path of the array to loop and it will run what’s inside the box for each entry in the array.
5. For each product group, we need to perform two tasks: update product inventory and send to fulfillment center for further processing. We can leverage the usage of a “Parallel State” to complete these tasks in parallel, this way the tasks take less time to complete than if they were sequential. For simplicity of the article, we’ll not jump into details on how each task is done.
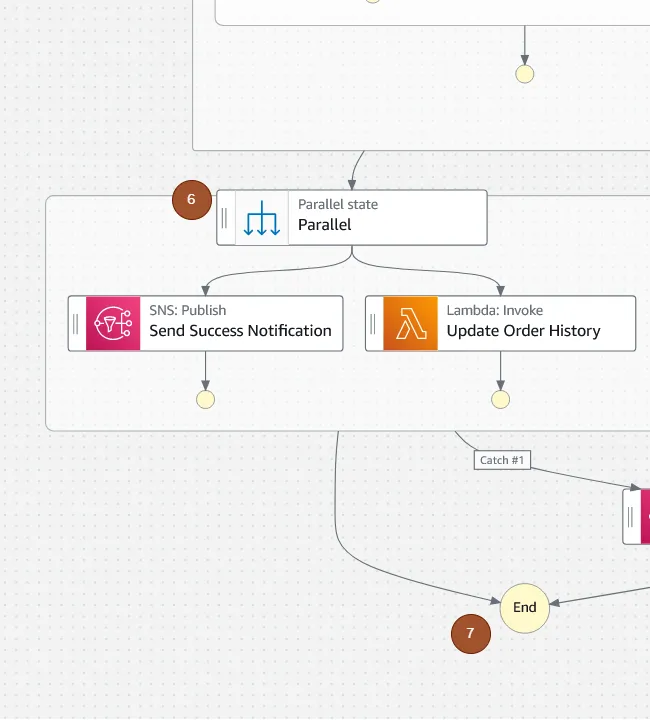
6. After each product group finishes executing each task successfully, it means all inventories were updated successfully and products sent to their respective fulfillment centers. So in this case, we can proceed to perform two tasks: send a “success” notification to the customer and update the order history. Again, we can leverage the usage of a “Parallel Step” to execute both tasks in parallel. For simplicity’s sake, I will not go into detail of each step.
7. After the notification is sent and the history is updated, we are done! We can end the execution of the step function there.
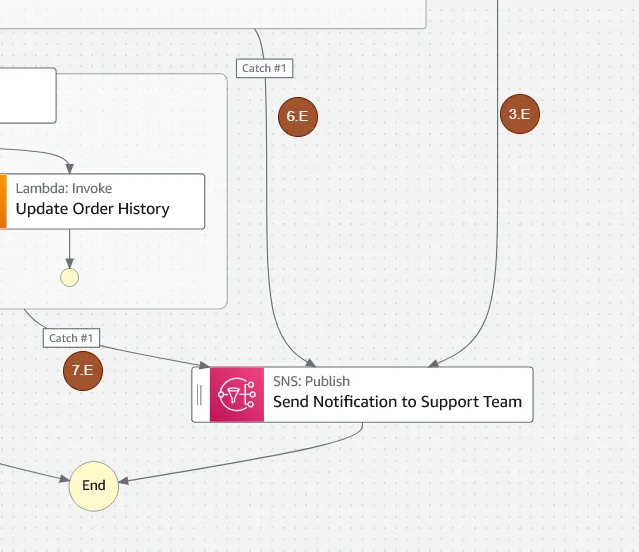
3.E, 6.E, 7.E (Error Scenarios): Notice that so far we have covered the “happy path”, where all individual steps succeed. But this is not always the case, as things can fail for a number of reasons. For example, the payment of the user may not have completed successfully, maybe the products couldn’t be sent to the fulfillment centers or maybe the success notification couldn’t be sent. In any case, the requirement is to handle these error scenarios.
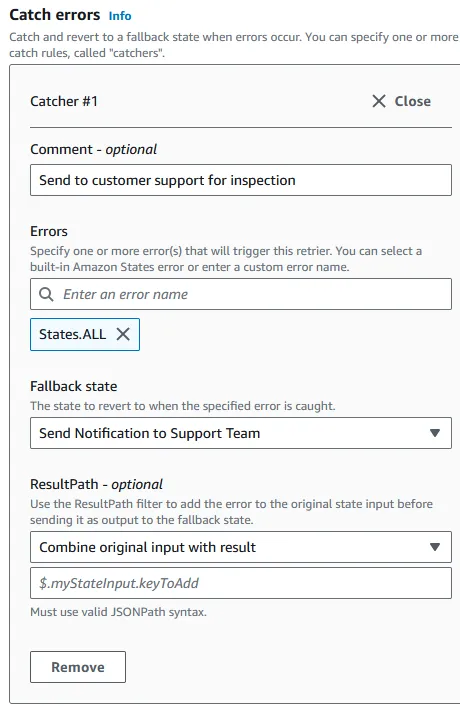
With Step Functions, we can set a “catch” configuration. In that catch we can specify which kind of errors we want to capture and where the Step Functions route the error scenarios. So in this case, we can set a simple catch that routes failures to the “Send Notification to Support Team” SNS topic, so that the customer support team can get notifications on failures and take appropriate action:
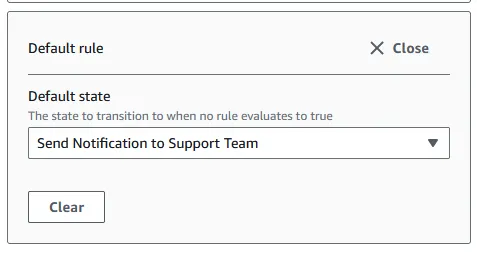
To handle “non-success” payments in the customer session, we can define a default rule in the “Choice Step” for Step 2. This allows us to define where to go if the rest of the choices are not evaluated as true, as shown in the image below:
Conclusion
In summary, this article outlines a streamlined approach for automating post-payment activities through AWS Step Functions, emphasizing the orchestration of tasks, parallel processing, and error management. By comparing orchestrator and choreographer patterns, it highlights the effectiveness of a centralized orchestration model, implemented in a practical AWS Step Functions workflow. This solution not only meets the requirements of post-payment processing of a typical e-commerce application, but also offers scalability, reliability, and seamless integration with AWS services, presenting a forward-looking framework for handling complex workflows in cloud environments.
References
- https://aws.amazon.com/step-functions/
- https://aws.amazon.com/blogs/compute/orchestrating-dependent-file-uploads-with-aws-step-functions/
- https://docs.aws.amazon.com/step-functions/latest/dg/welcome.html
- https://camunda.com/blog/2023/02/orchestration-vs-choreography/
- https://docs.aws.amazon.com/lambda/latest/dg/services-stepfunctions.html


%20(1).svg)

.svg)