

Introduction
It’s so easy to code, bundle and debug with pure JavaScript, so why use TypeScript? It’s a controversial topic, but it’s not about JavaScript vs. TypeScript. I don’t want a flame war here, rather, I just want to ask you a simple question:
“Why don’t you use TypeScript with Serverless Framework?”
The real reason I expect you don’t use TypeScript:
“I don’t want to use TypeScript”.
Unfortunately, the main reasons why people are not using TypeScript with Serverless Framework yet:
“It’s hard to configure bundle, run lambdas locally with hot deploy and make a debugging process”.
So let’s simplify this, what I intend to do with this article is to pave a road for you to explore TypeScript by yourself without the pain of configuring it. Let’s make a project so simple to configure with TypeScript that you’ll swear it was simple like JavaScript.
Are there other alternative templates for TypeScript + Serverless Framework? Absolutely, but for now don't worry about how many solutions exists. If you are not a TypeScript expert, but you use the solution that I present in this article, then you already have an advantage over JavaScript — and this one is very simple to use and understand.
Seriously, all you’ll want to do is run your lambda locally, make changes in your code without restarting 'serverless offline' and debug your lambda locally like this:
So, let’s move on and I will show you how to set up your project like this.
Serverless Framework JS vs. TS?
Understanding JS First
Before showing you how to configure your project in TypeScript, let’s think a little bit about how we use JavaScript:
- We configure triggers handlers (for examplAPI Gateway) 'serverless.yml' pointing it to the '.js' files;
- In order to run lambdas locally, we use can 'localstack' or 'sls invoke local --function functionName', but for this example I will use only 'serverless-offline';
- For the packaging process we include/exclude some files as desired in 'serverless.yml';
- We can run 'serverless package' or 'serverless deploy' and it’s all done, simple like that;
- In order to debug on VS Code we create a '.vscode' folder with a 'launch.json' configuration file running 'serverless-offline' for example.
What’s the Difference When Using TS?
We have to transpile TypeScript into JavaScript and there are many ways of doing this.
- Many ways for transpiling: 'tsc', 'tsup', 'tsx', 'ts-node', 'swc', 'esbuild';
- It generates a build folder with transpiled js;
- Instead of running only 'tsc' for example, you can combine with 'webpack' for optimized bundles, minifying and removing dead code for example;
- So you configure a 'npm run build' script to run this build command;
- Needs to point all handlers to '.js' in the generated build folder;
So, is that simple? Wait, calm down, because…
The Game Has Just Begun
⚔️ Round 1: Plugins, easier life
To simplify this configuration process we are going to use 'serverless-esbuild' for running code and making a bundle. I considered the following advantages with this plugin:
- You can point your handlers to '.ts' files directly instead of needing to point to '.js' in the build folder;
- You don’t need to do a 'npm run build' script when you run a 'serverless package' or 'serverless deploy' because this plugin bundles automatically before packaging;
- 'esbuild' is built on top of Go lang and is compiled to native code, so it is very fast;
- It integrates very well with 'serverless-offline';
So, let's configure it and include it along with 'serverless-offline' on your plugins inside 'serverless.yml':
You don’t need to point your handlers to '.js' in the build folder; use '.ts' instead in the source folder:
The folder structure will look similar to this:
You can now use 'serverless offline start' to run your API Gateway Lambda locally.
⚔️ Round 2: Hot Reload 🌶️
Do you want to change your TypeScript code and see what gets affected while running the 'serverless offline start' command without restarting it in order to enhance your productivity?
You need a watcher: when you save '.ts' files, it will transpile into the build folder automatically.
For this sample project I used 'serverless-esbuild', and to activate the watcher put this in 'serverless.yml':
Next, 'run serverless offline start' and start doing changes on your code as an experiment.
Did it work? No?
Sorry, but 'serverless-offline' reuses your local lambda. So, even using a watcher your changes won’t take effect, but there is a way to skip this lambda “cache”.
To skip this Lambda “cache” you have to run 'serverless offline start --reloadHandler' instead. Oh yeah, now we have hot reloading working!
⚔️ Round 3: Log Messages
When you get a 'throw new Error('message')', what happens? The printed stack trace is showing you the error at the generated .js files, but it’s a little bit too messy to actually help us understand anything about our code 😐.
We need to tell the lambda what is the '.ts' file line number/position equivalent to generated '.js' files, which the solution is a 'sourcemap'. Fortunately, 'serverless-esbuild' plugin helps us with it:
Before:
After:
⚔️ Round 4: Debugging in VS Code
There are some points to consider when debugging:
- Lambda has a 30-second timeout;
- When you stop on a breakpoint to debug, you can get delayed more than 30 seconds for this;
- You are running '.js' code, but you need to stop breakpoints on '.ts';
If you want to start your server directly from VS Code and activate the debugging mode, you need to create a dev script on 'package.json' and a '.vscode' folder with a 'launch.json'. Here is my ready-to-use configuration for this:
- '--noTimeout' flag on 'serverless offline start' disables the 30-second timeout from Lambda, nice, right?
- '"outFiles"' read the bundle folder to understand where the running code came from;
- '"sourceMaps": true' takes care of your breakpoint and works correctly on '.ts' while running '.js' code.
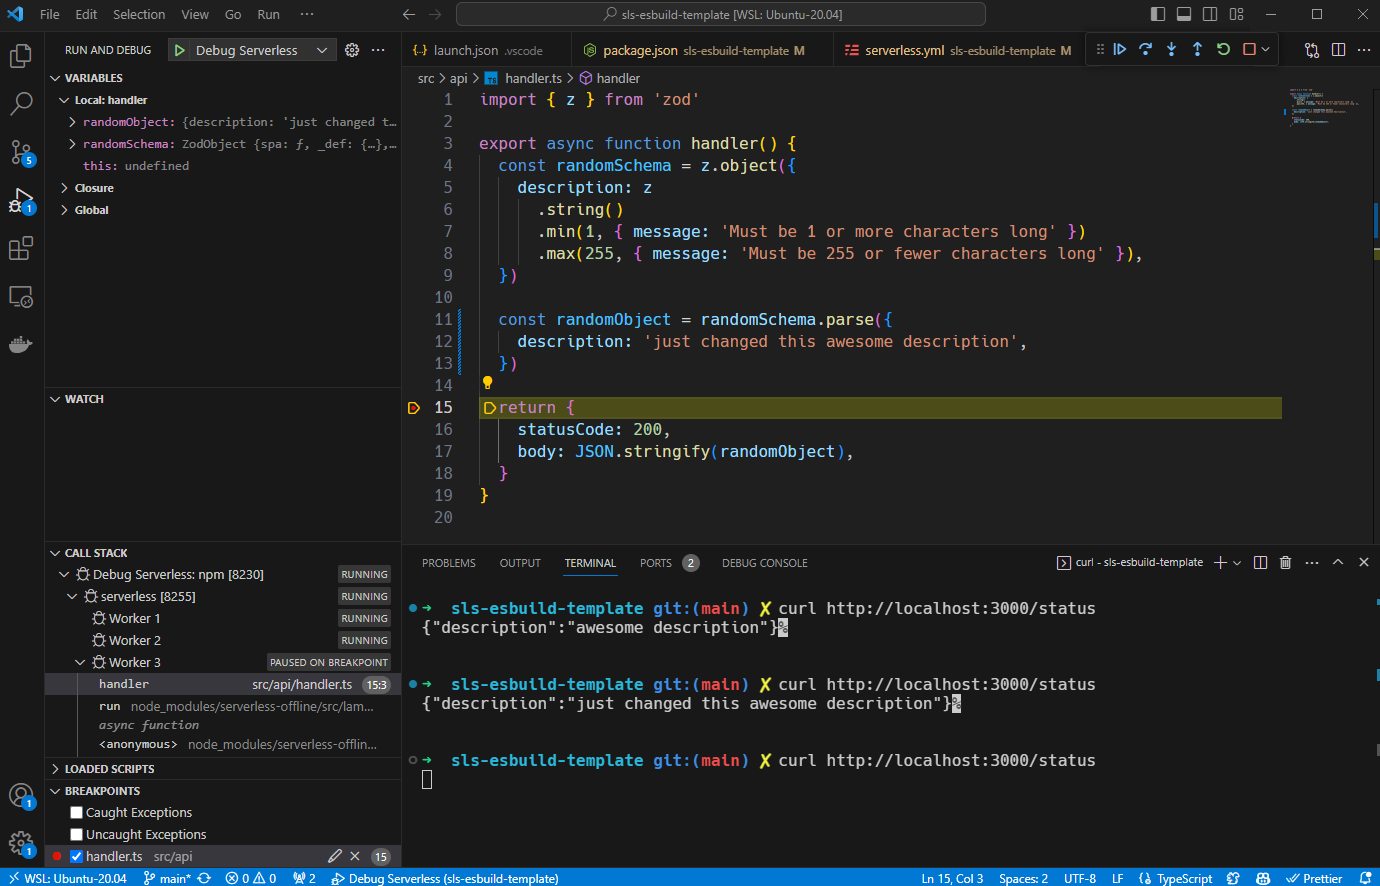
I bet you are happy now because you can run the Debug mode from VS Code:
.png)
⚔️ Round 5: Optimize your bundle
Minifying, removing dead code and excluding dependencies from packaging. Let’s go!
- First point: 'esbuild' when running in bundle mode enables tree shaking, a common compiler optimization that automatically removes unreachable/dead code;
- Second point: A common case when running lambda locally you need 'aws-sdk', but when running lambda on AWS you don’t;
- Third point: Minifying code locally may confuse the debugging process.
So, here is my ready configuration for solving these 3 points:
It’s done, all you need to do is use 'serverless package' or 'serverless deploy', it will be bundled seamlessly, quickly and well-optimized.
Conclusion
Sometimes developers get discouraged using TypeScript with Serverless Framework and there are many reasons for this:
- There are many possibilities for transpiling only a single '.ts' file. Transpilers, bundlers, webpack… Oh… It’s a configuration hell;
- There are many more tutorials for setting up Serverless Framework with JavaScript than TypeScript;
- There is a lack of tutorials for setting up TypeScript not only for bundling but also for hot reloading and debugging— which is essential for developer survival.
In other words, this task should not be so complicated. What I intended to do here is remove the complexity barrier, so you can painlessly introduce yourself to Serverless Framework with TypeScript today.
Check out the repository I made for this article, it’s more complete than this little tutorial, it’s a ready-to-use template. Feel free and enjoy 😄.
References
- Example Repository: https://github.com/JefAlive/sls-esbuild-template
- Serverless Esbuild Plugin: https://github.com/floydspace/serverless-esbuild
- Serverless Offline Plugin: https://github.com/dherault/serverless-offline
- Tree Shaking: https://esbuild.github.io/api/#tree-shaking
- Hot Reload thread on Github: https://github.com/dherault/serverless-offline/issues/864#issuecomment-1190950178
- AWS Lambda Node Sourcemaps Support: https://serverless.pub/aws-lambda-node-sourcemaps/


%20(1).svg)

.svg)


