

Introduction
In this article, we will take a look at a use-case that represents how to Run Serverless Containers Using Amazon EKS and AWS Fargate.
Using Amazon EKS to run Kubernetes on AWS gives your team more time to just focus on core product development instead of managing the infrastructure of core Kubernetes. Kubernetes on AWS has good scalability, is easily upgradable, has the AWS Fargate option to run Serverless containers, and more.
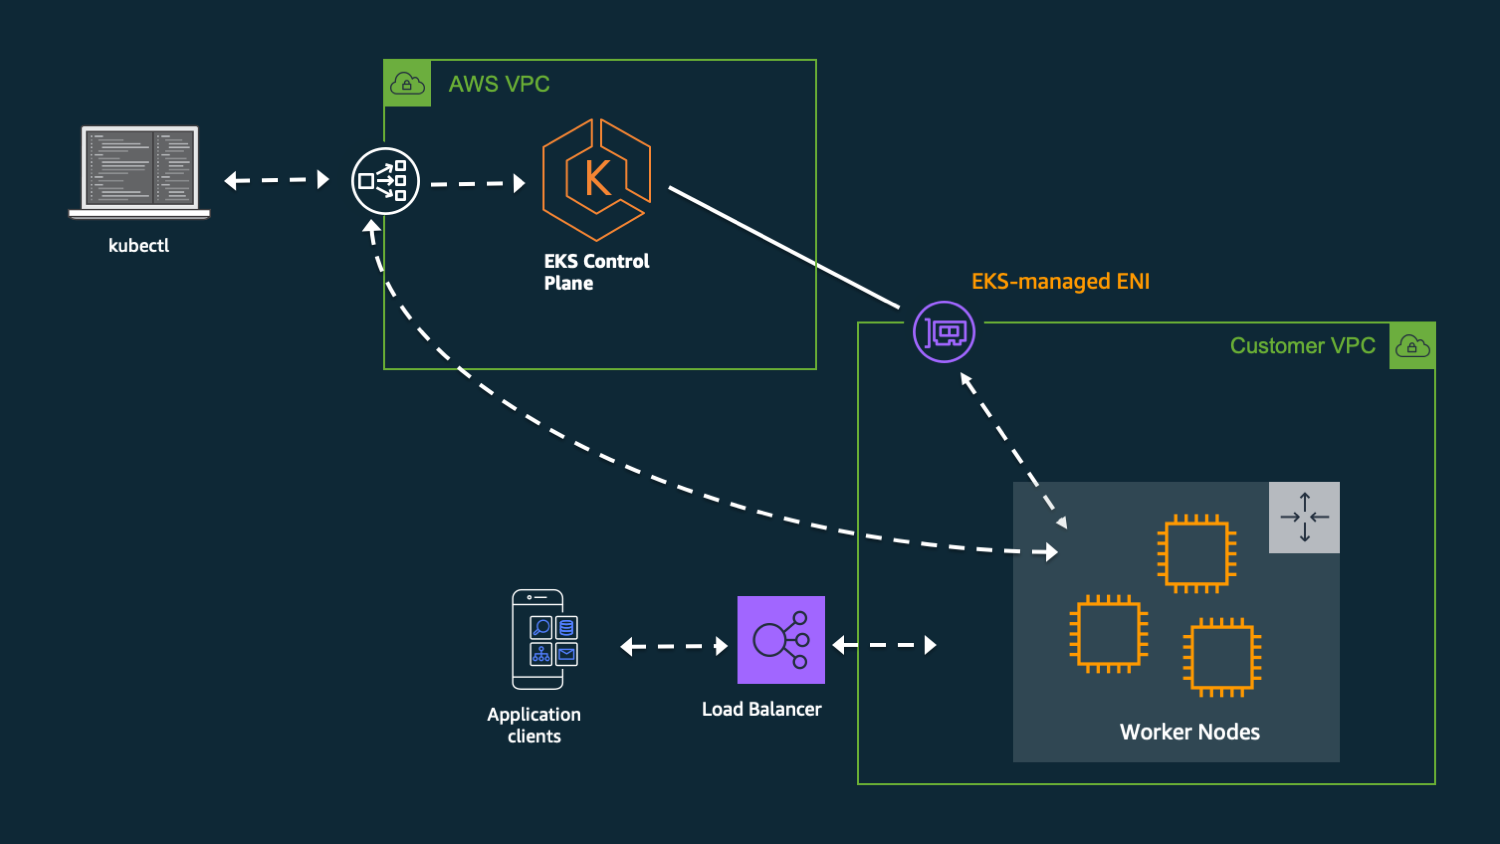
Architecture
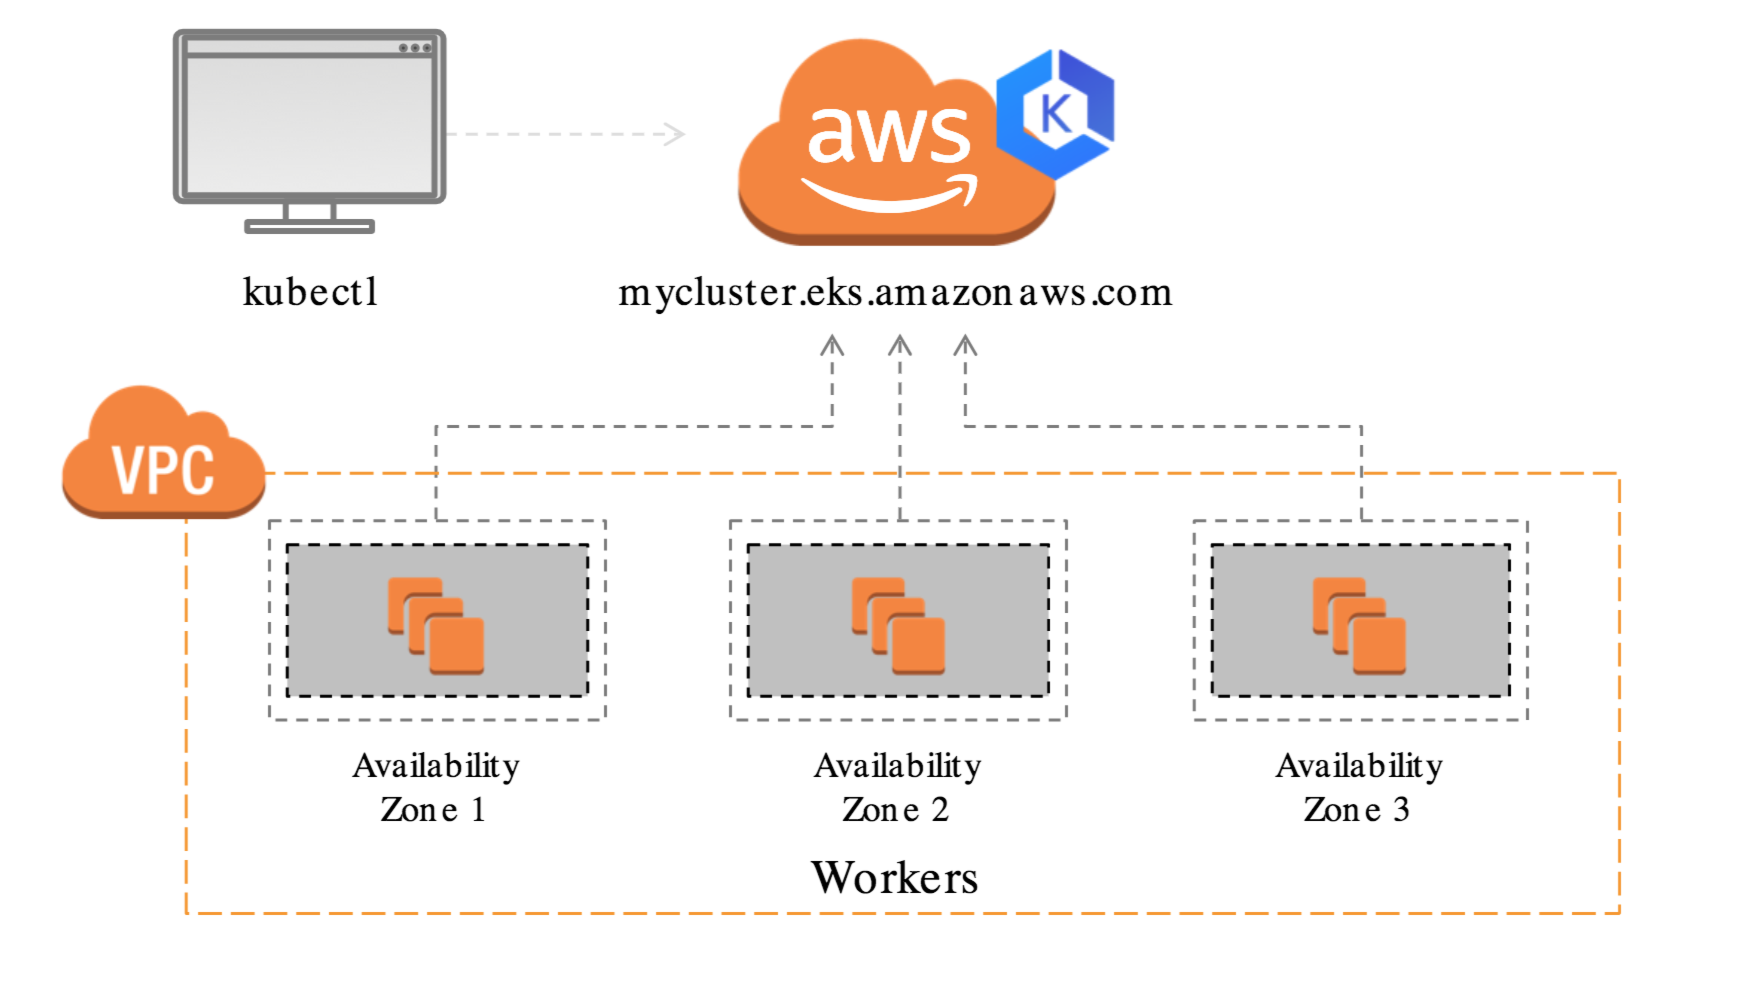
The above architecture represents running Kubernetes on AWS using Amazon EKS.
What is Amazon EKS?
Amazon Elastic Kubernetes Service (Amazon EKS) is a managed service that you can use to run Kubernetes on AWS without needing to install, operate, and maintain your own Kubernetes control plane or nodes. Kubernetes is an open-source system for automating the deployment, scaling, and management of containerized applications. [1]
What is Amazon EKS Cluster?
Amazon EKS Cluster consists of two primary components:
- The Amazon EKS Control Plane - Configure and Manage Kubernetes Services
- Amazon EKS Worker Nodes - Configure and Manage User ApplicationsEKS provides a different way to configure worker nodes that execute application containers like Self-Managed, Managed, Fargate
The EKS Cluster consists of the above 2 components deployed in two separate VPCs.
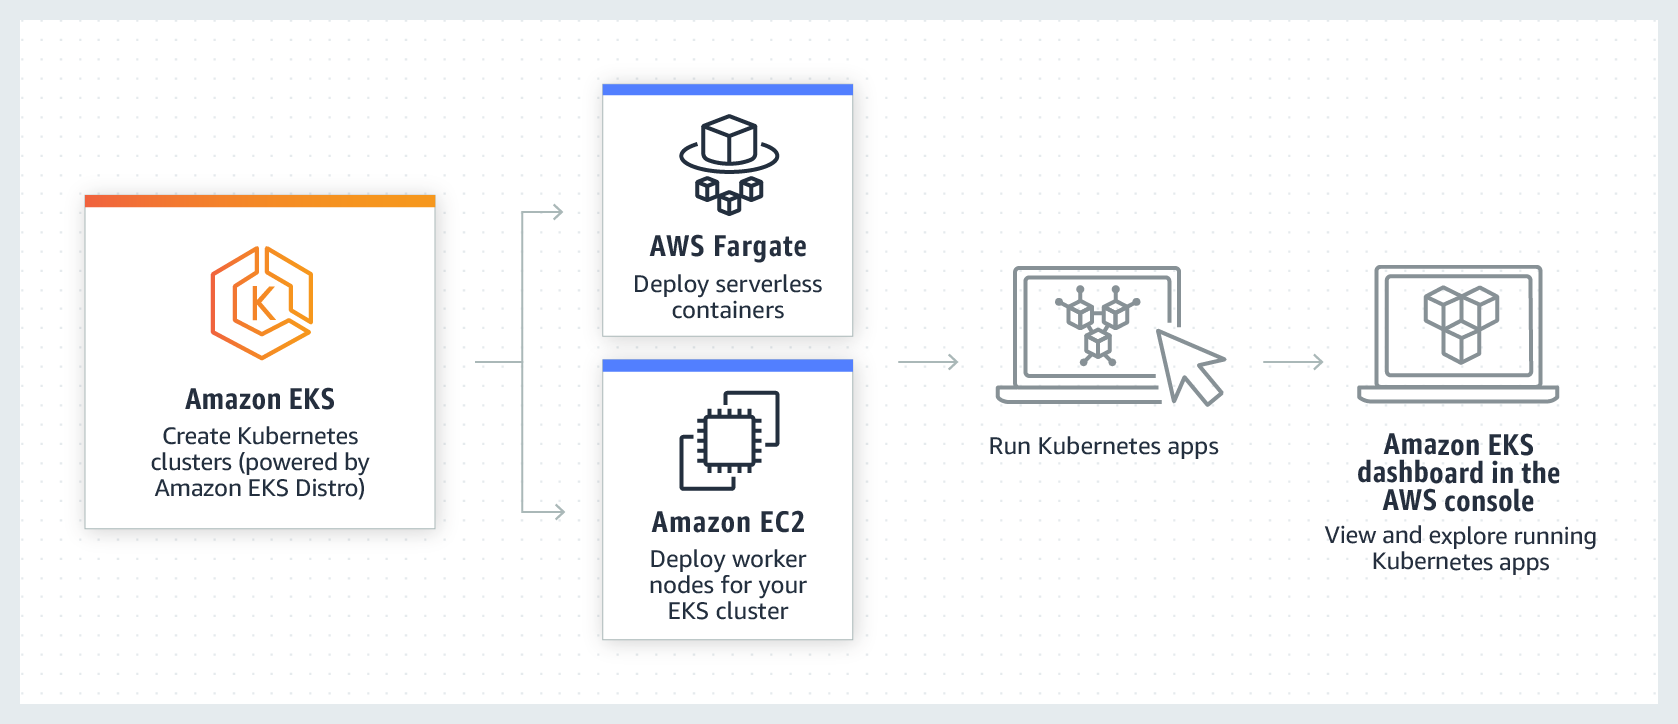
What is AWS Fargate?
AWS Fargate is a serverless, pay-as-you-go compute engine that lets you focus on building applications without managing servers. AWS Fargate is compatible with both Amazon Elastic Container Service (ECS) and Amazon Elastic Kubernetes Service (EKS). [2]
Recently, AWS announced that AWS Fargate now delivers faster scaling of applications. Now AWS Fargate enables customers to scale applications faster, improving performance and reducing wait time. AWS has made several improvements over the last year that enable you to scale applications up to 16X faster, making it easier to build and run applications at a larger scale on Fargate, along with that AWS Fargate increases task launch rates.
How does Amazon EKS work?
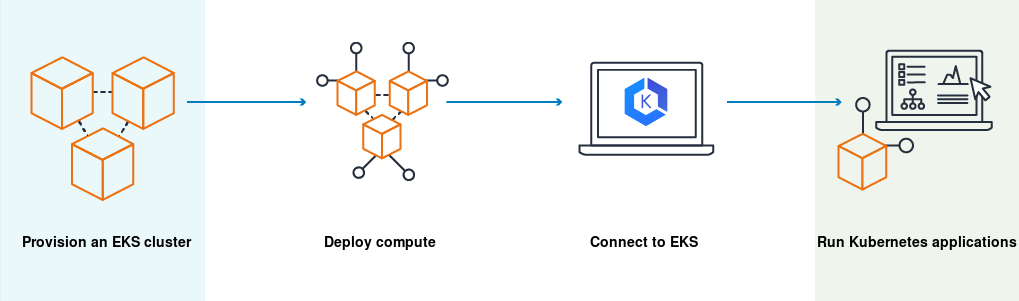
Amazon EKS Workflow:
- Create EKS Cluster
- Deploy Compute - Launch Amazon EC2 nodes or Deploy your workloads to AWS Fargate
- Connect to EKS - Configure Kubernetes tools (such as kubectl) to communicate with your cluster
- Deploy - Manage Workloads on your Amazon EKS cluster using the AWS Management Console
Setup Environments - Must Have Installed below:
- AWS CLI – CLI tool for working with AWS services, including Amazon EKS
- kubectl - CLI tool for working with Kubernetes Clusters
- eksctl - CLI tool for working with EKS clusters
- Docker Engine - For building and containerizing applications
- NodeJs - For application development JavaScript runtime
Setup AWS CLI Default Configuration - AWS configure
Make sure to create a relevant IAM User with programmatic access and relevant credentials with this AWS configuration step. To learn about how to create this AWS IAM user, see this article.
Create Amazon EKS Cluster
There are multiple ways to create an Amazon EKS Cluster (like AWS Console, AWS SDK, & more).
Create an EKS Cluster with Fargate Nodes using the eksctl command below:
This single command will provision an EKS Cluster along with VPC, Subnet, IAM Roles, RouteTable, Fargate Profile, Fargate Nodes, and more with the CloudFormation stack.
This command will take 15-25 minutes and your terminal will display all the resources created as part of creating the EKS Cluster.
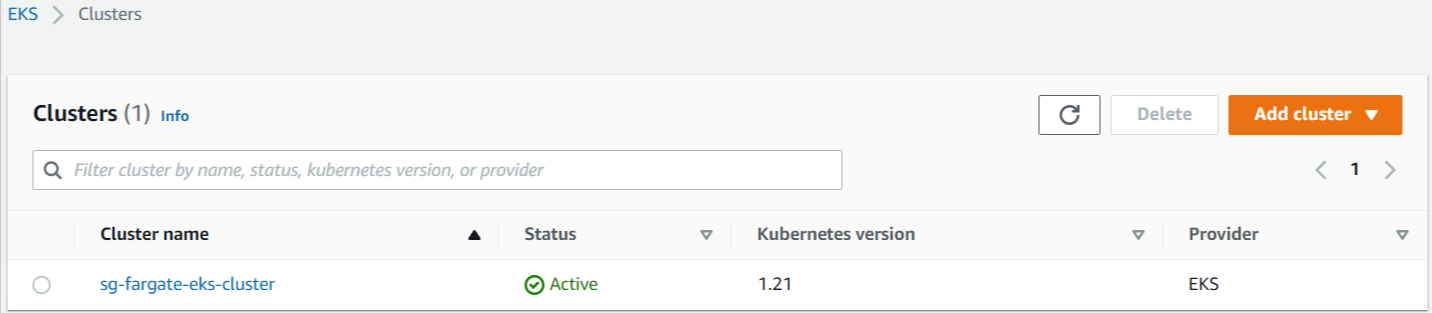
Amazon EKS Cluster
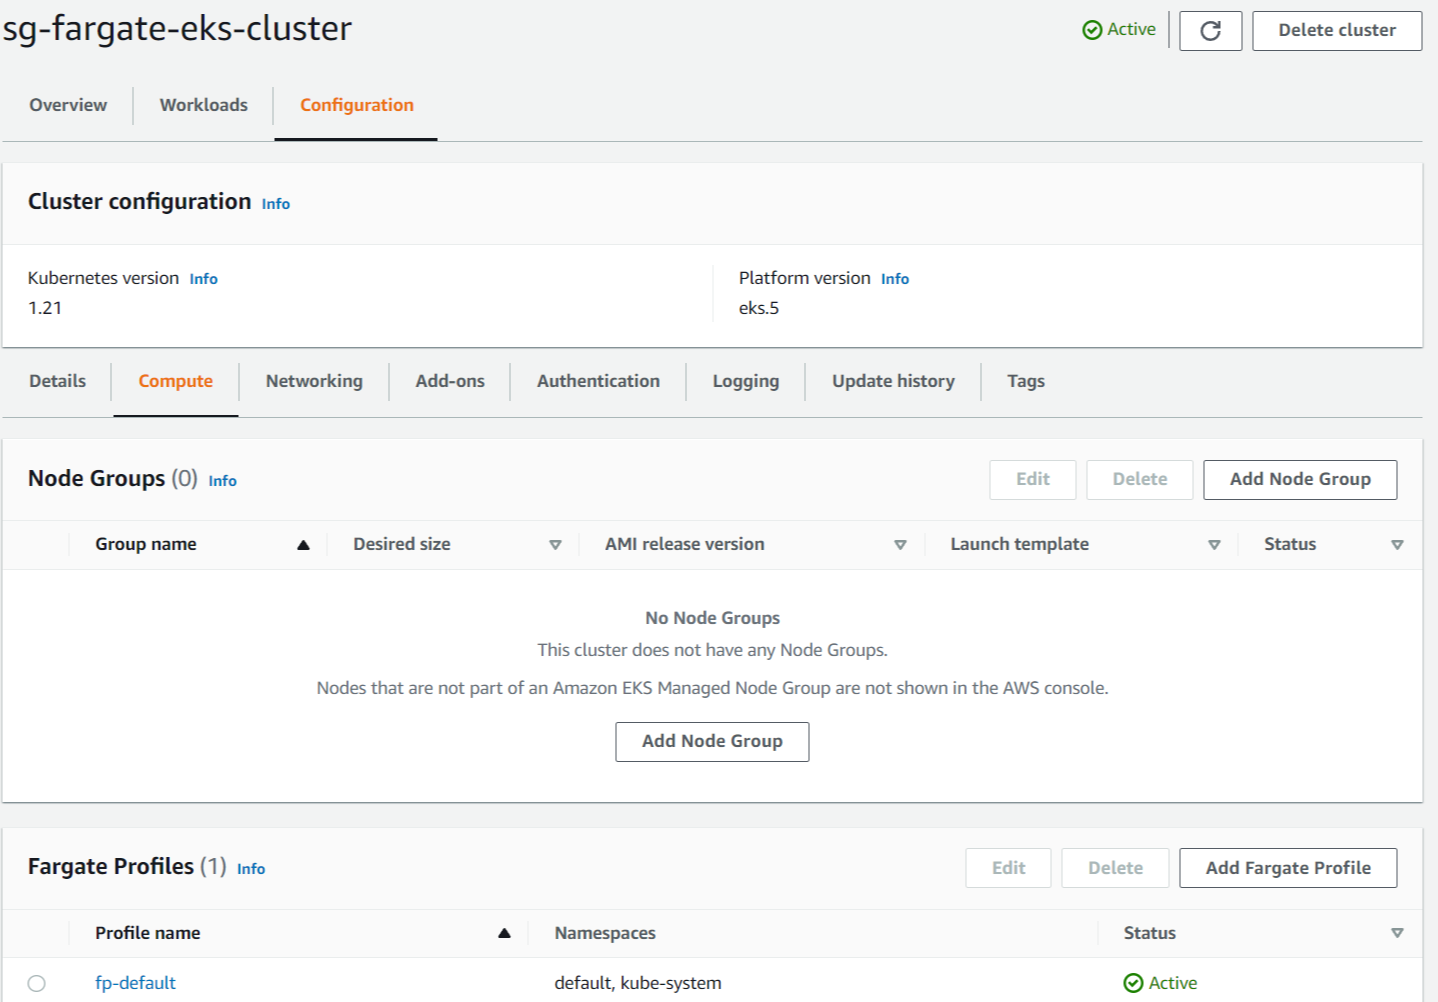
Amazon EKS Cluster Fargate Profiles
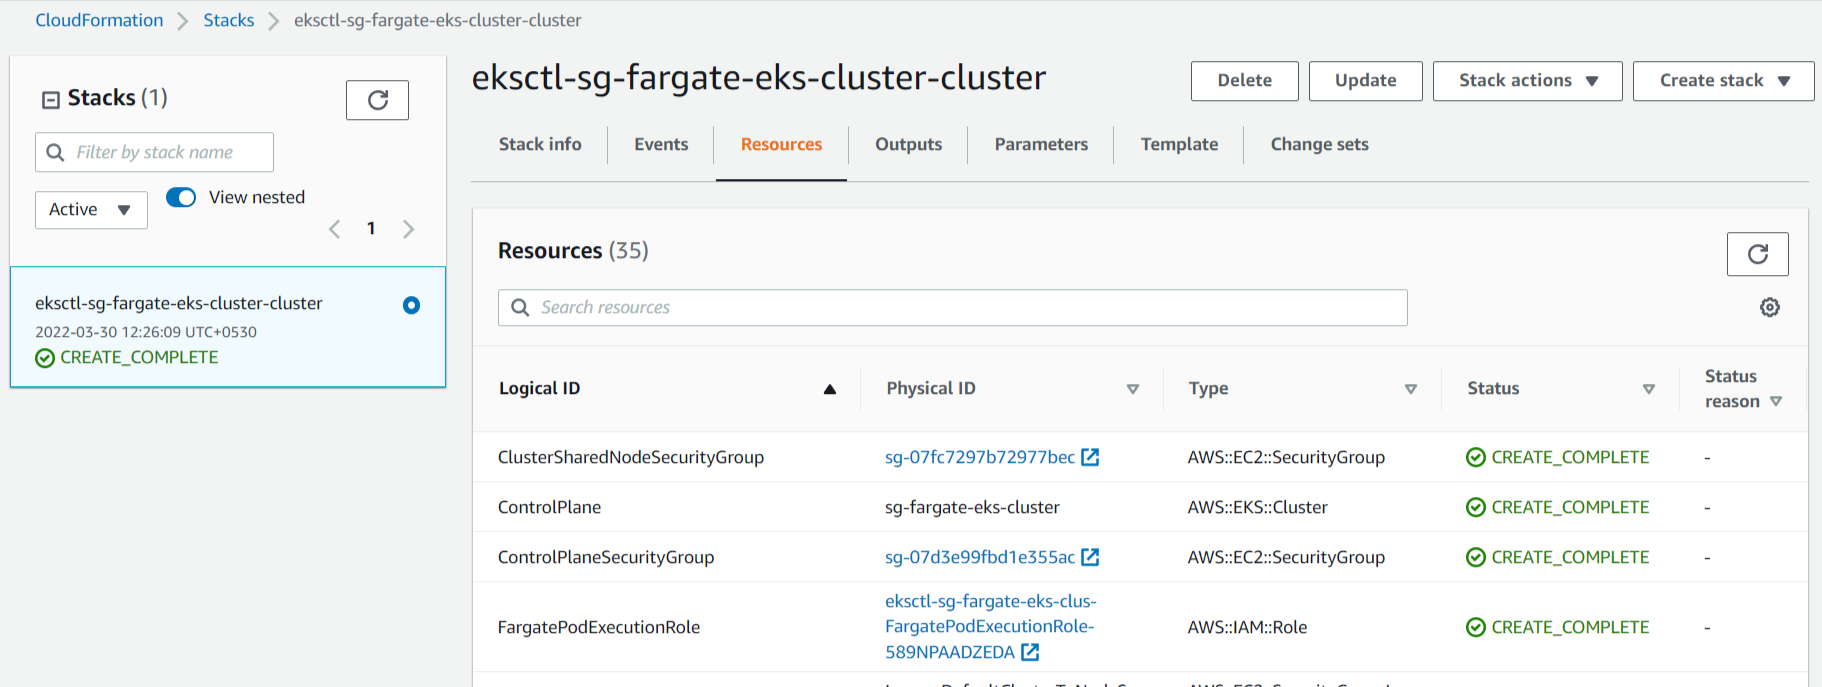
CloudFormation Stack
Final Project Folders and Files Setup (For Reference)
Below is what your final project will look like by following each section of this article. I’m sharing it now so you can check what I have versus what you have as the article continues.
Create a NodeJs Application
Create a node project folder and initialize npm with express to run the server
Create index.js file with this code
It will create a server that listens on port 80 using node express
Dockerize the NodeJs Application
Create Dockerfile file in the root of the same project
Build and Run Docker image
In local try to access http://localhost; it should return the below response if all is good.
Container Registries
Amazon Elastic Container Registry (Amazon ECR) is a fully managed container registry that easily stores, shares, and deploys container images.

Create Amazon ECR Repository
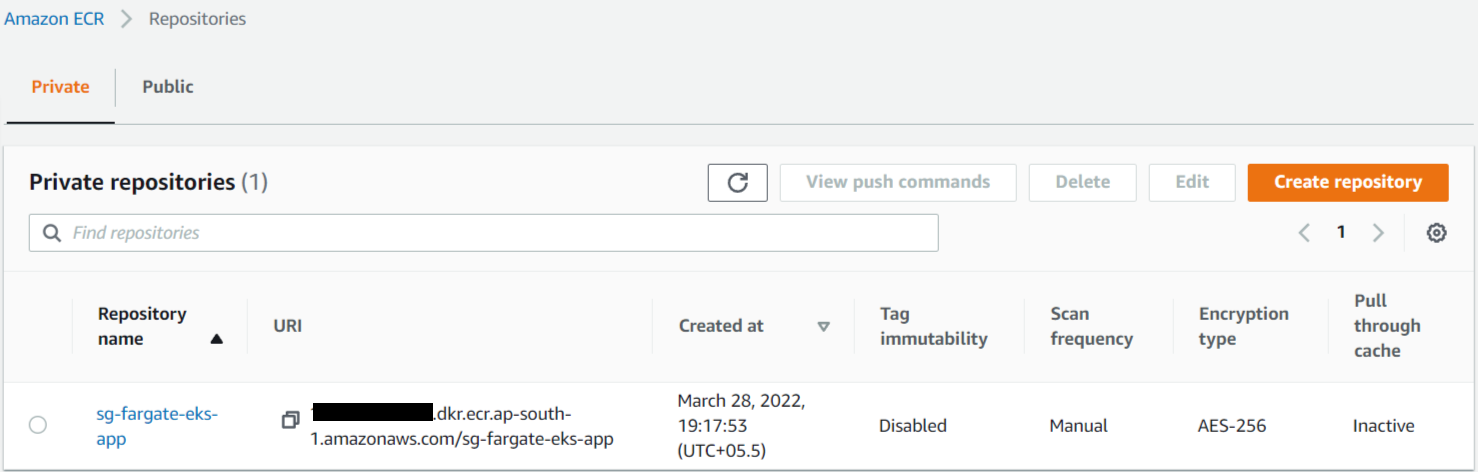
Amazon ECR → Repositories → Create Repository
This newly created ECR Repository is used to store the nodejs application docker image, which EKS will use.
Amazon ECR Login
Do docker login to ECR for doing operation with the ECR repository. I’m using ap-south-1, feel free to change commands to match your region.
Push Docker Image to Amazon ECR Repository
Push already created the nodejs app docker image in the Amazon ECR Repository.
Deploy to Amazon EKS Fargate
For deploying the application we are using kubectl, a CLI tool, which will communicate with the Kubernetes Control Plane.
Create Deployment
Creating a Deployment type Kubernetes workload for deploying the app.
sg-sample-deployment.yaml
This file is used to create a deployment-type workload within the cluster. The container image used as part of this file is the same which we pushed into the Amazon ECR Repository in the previous steps. Container listens on port 80 for HTTP requests and has 1 replica.
Asking EKS to launch 1 replica of the sg-fargate-eks-app container to run across the cluster. According to needs, it is able to change that number on the fly- it will allow scaling application up or down. Having many replicas assures high availability since pods are scheduled across multiple nodes. Replica's purpose is to maintain the specified number of Pod instances running in a cluster for high availability.
The above deployment file is used in the below command.
Using kubectl, launch this deployment. It will create ‘Deployment’ type Kubernetes ‘Workloads’ with the name ‘sg-fargate-eks-deployment’ under the ‘default’ namespace. Application deployed to Fargate instance type node within relevant pods using provided container image of the app.
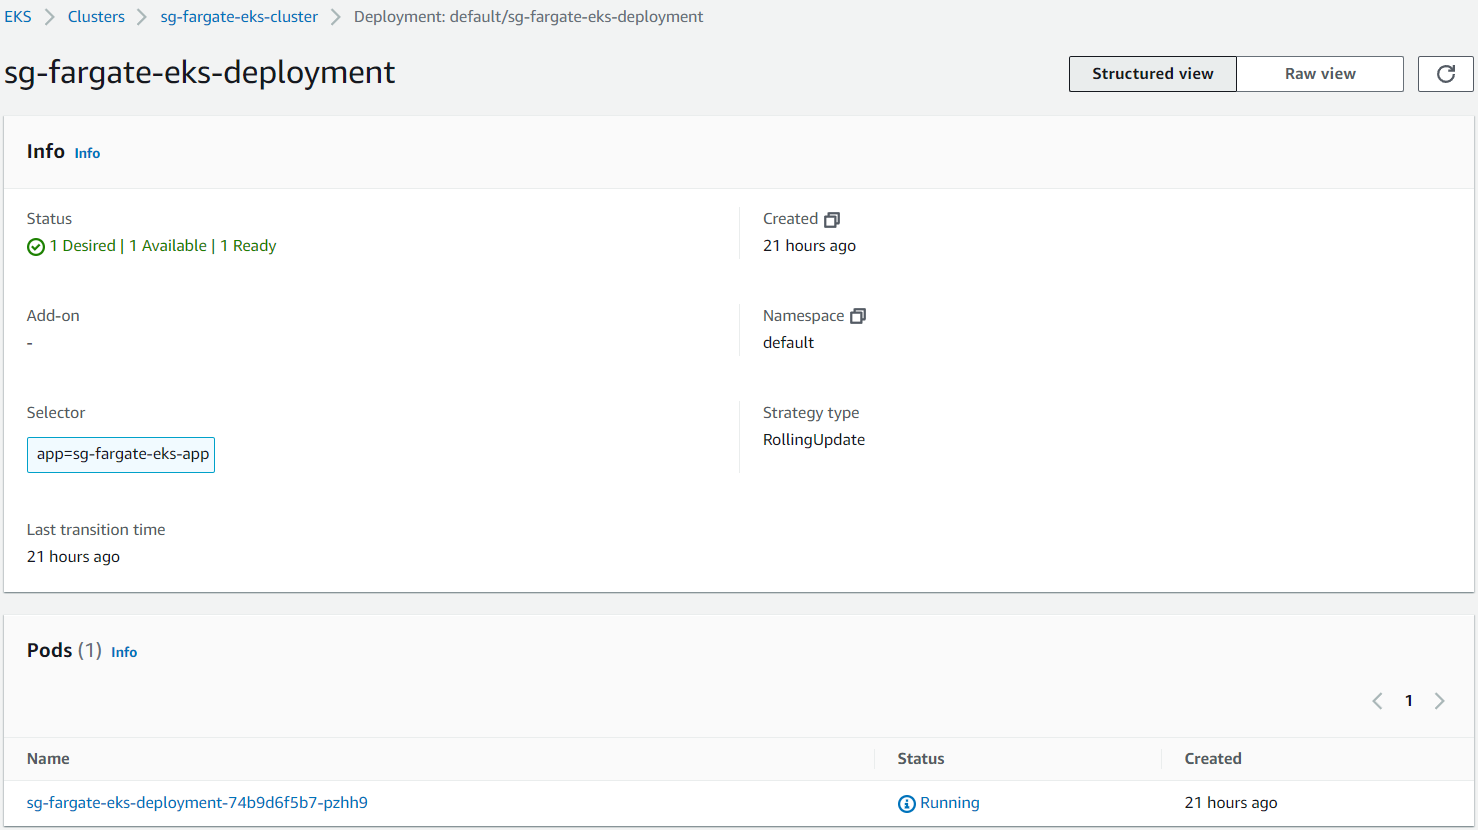
The above image show EKS Kubernetes Deployment & relevant Pods.
Below, the kubectl command helps to get the ‘pods’ list running on your cluster within the default namespace.
Below, the kubectl command helps to get the ‘deployments’ list running on your cluster within the default namespace.
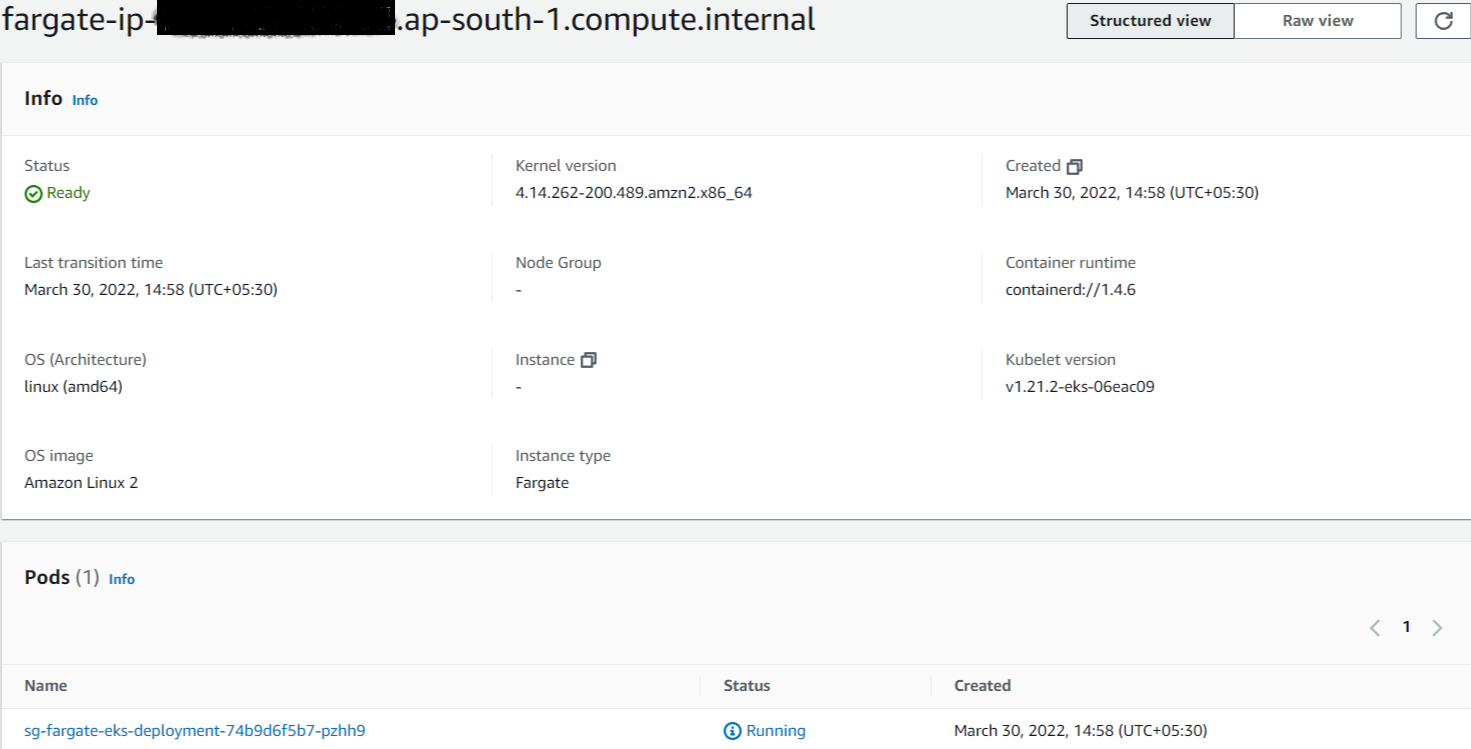
The above image show EKS Fargate Node running Pods.
Create Service
It is not a secure way to expose the internal components of a cluster to the outside world directly, so it is always better to deploy some services in front of the cluster.
For this, we will create a Kubernetes service. Kubernetes support different types of services; see here for more details. For the current article, we are using a Load Balancer type service.
Overall, we are using the Fargate instance for nodes, ELB for exposing services to the outside world, and VPC for networking inside the EKS cluster.
sg-sample-service.yaml
We are able to create a Kubernetes service of the type LoadBalancer by creating sg-sample-service.yaml file and adding the following contents inside that:
The below command will create a Kubernetes service of the type LoadBalancer.
Within a few minutes, the Kubernetes Service will be up & running and able to connect to the applications. We are able to access the application using the “EXTERNAL-IP” of the service.
Above, the kubectl command gives Kubernetes services details along with EXTERNAL-IP.
Service should be accessible using a browser or command line curl like above using EXTERNAL-IP.
Cleanup Resources on AWS
Above kubectl & eksctl commands useful to remove different resources EKS Cluster, Kubernetes Deployment, Kubernetes Services.
Conclusion
Using Amazon EKS to run Kubernetes on AWS gives your team more time to just focus on core product development instead of managing the infrastructure of core Kubernetes. Kubernetes on AWS has good scalability, is easily upgradable, has the AWS Fargate option to run Serverless containers, and more.
Amazon EKS with AWS Fargate allows for Serverless Containers to be run. We are able to provision, manage, and deploy Amazon EKS resources using different tools like eksctl, kubectl, and awscli.
The scope of this article covers the basic ideas around Amazon EKS with AWS Fargate, which will allow you to easily explore it after reading this article.
Sources
[1]https://docs.aws.amazon.com/eks/latest/userguide/what-is-eks.html
[2]https://aws.amazon.com/fargate/


%20(1).svg)

.svg)


