

Have you ever wondered how hard it is to build a face recognition application nowadays? I asked myself the same question, and the answer might surprise you. Spoiler alert - easy!
Let’s go straight to the point and see what we are going to build:
- Progressive Web Application (PWA)
- Serverless backend using AWS Lambda, Amazon S3, and Amazon Rekognition
What is PWA
Progressive Web Application is a web application built with standard HTML, CSS, and JavaScript technologies that can be installed on your desktop or mobile device using your browser as a delivery method. It is just a regular web page that does not require any kind of unique bundling or packaging, nor does it need to be delivered using Google Play, the AppStore, or something similar. To put it simply, you open your web browser, visit the web page, and it gives you the option to install it on your device. Depending on your platform, the message can be different, but it does the same thing.
PWAs are supported on all platforms, with an important note about Apple. Because of their monopoly policy that tries to kill the web, you can only use Safari on macOS and iOS to add PWA onto the home screen. Hopefully, this will end like how Microsoft was tamed down at the beginning of the 21st century, but that is a different story.
You don’t need any kind of framework to build a PWA. You need to follow the rules and specifications to make an application installable. However, to speed things up, you can use anything you are comfortable with. I'm going to use Ionic Framework with Angular. To start things rolling, visit this excellent blog post that I also used to jump-start my project.
What is Amazon Rekognition
Lambda and S3 are common and known services to every developer, so I will not spend time describing what they are. The more exciting part of our application development is the Rekognition service which is a part of the AWS Machine Learning service offering. It is a visual analysis service that can, with its pre-trained models, analyze your video or image input.
Rekognition can recognize text in the image, identify the celebrities in the photos, compare faces, and analyze faces, giving you information about age, emotion, and whatnot.
Our application will use DetectFaces API, which can recognize up to 100 faces in the image. For each face, we will receive attributes in the response, such as
- Position of the face in the photo
- Age range
- Does the person wear eyeglasses?
- Are they wearing sunglasses?
- Gender
- Are they smiling?
- And even the things like are their mouth open, do they have a beard, mustache, etc.
The App
The workflow is as follows:
- Take the photo from the gallery or your device camera
- Get the pre-signed URL with the random file name to upload the file to S3
- Upload the file
- Call the Amazon Rekogntion API with the generated file name to analyze the image
- Present the response
To create the PWA, we will need to do the following:
- Install tools
- Generate project
- Add Camera plugin
- Call the backend APIs
- Write a code to display the results
- Deploy application
We will call our application “agnitio” which is a Latin word for Recognition.
Install Ionic tools:
Install Angular and add PWA tools:
Add Camera plugin:
I will not go into too many details about the Ionic and Angular, but if you are interested in learning more, check out the Ionic blog post mentioned earlier then browse their documentation page. You can find the relevant part of the code in the `src/app/home/home.page.ts` and `src/app/home/home.page.html` files.
Now, here is where the magic happens:
What is left is to set up a backend project. We will use the Serverless framework.
We need two Lambda functions. The First Lambda function generates the pre-signed URL. The second Lambda function will call the Rekognition API. You can find the full source at the end of this article. Check the `backend` folder in the root directory of the project. Please note that we are using AWS SDK for JavaScript v3.
We will update the serverless.yml file to use the installed plugin, then add the definition for our two endpoints. I am using parameter store to define the bucket where the images for the analysis will be stored.
Generate pre-signed URL Lambda:
Call the Rekognize API Lambda:
Deploy the App
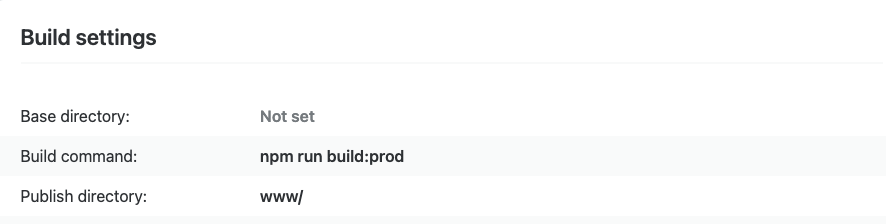
As I mentioned at the beginning of this article, PWA is just a Web Application. We don’t need Google Play or the App Store to distribute it, but we do need to deploy it somewhere and make it available for our users. The fastest way this time was to use the Netlify service. I have connected the repository and given permission. The only important thing to remember is that you must provide a build command so the Netlify service can know how to build your app. For my version of Angular, that command is
The distribution folder name where the artifacts are stored is called `www`.
Of course, you don’t need to use Netlify, you can deploy your app to any web server. It is just a normal web application. For example, you can fork the code and expand it further by adding CloudFront distribution instead of Netlify, but that is up to you.
Conclusion
Finally, believe it or not, that is the full application in less than 2 hours! With the help of the Ionic Framework and AWS Services, we have just built a serverless face recognition application. It works in the browser, but for the best experience, open it in the browser on your phone, then add it to your home screen. Start from there and try. Here is the link to the app in production:
https://famous-fairy-e0b928.netlify.app
Here is the link to the full source code:
https://github.com/bind-almir/agnitio
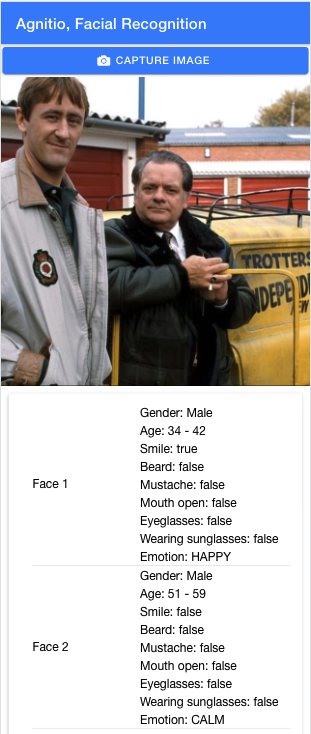
Here is the example of the results of the analyzed image:
I encourage you to experiment with other services as well. There are endless possibilities and use cases where this can be applied. You have the tools, don’t hesitate to use them!


%20(1).svg)

.svg)


