

Who is Vercel?
Vercel, formerly known as Zeit, is a platform for building Jamstack websites that deploy instantly without any required supervision. They scale automatically and require minimal configuration to start working.
The reason for their simplified, quick deployments is because Vercel is powered by AWS Lambda, making your deployments serverless and scalable at the same. This way you can accelerate front end development and reduce overhead, thereby creating a product-focused application.
They also support deployments from a variety of static-site generation frameworks like Vue, Gatsby, Nuxt, and Svelte, to name a few. Next is their very own React-based implementation for website generation, which we’ll also be exploring in this article.
We’ll now deploy a simple blog made with Next.js that is part of their samples (available on github) and understand how Vercel works.
Getting Started on Vercel:
Vercel works by managing projects and deployments from Git enabled tools (Bitbucket, Github, Gitlab).
I chose Github to manage my Vercel projects. As the onboarding process moves along, you can either import an existing application or create a sample template. Choose Next.js as the framework and create a sample that Vercel will then push to Github and deploy the project.
After the deployment, you will see your application as part of the Vercel dashboard where you can manage its settings. Let’s dive into the platform with a sample blog application made with Next.js that renders content using markdown files.
How Next.JS Works:
Let’s explore some Next.js fundamentals before we get into working with Vercel.
With node already installed in your machine run the following commands to download the blog app into your system and install project dependencies.
npx create-next-app — example blog-starter blog-starter-app
npm install
If you look into the root directory of the downloaded blog application, you will see the following folders. (These folders are base folders for any Next.js website)
- pages folder — Vercel employs the concept of pages for every file (which is a React component) created under this folder. Index.js would denote the root of the site and any subsequent files created here would have routes as per the filename. For example, contact.js would be accessible at /contact. Dynamic routing becomes possible when filenames are created with brackets, example ‘[slug].js’
- public folder — All static assets that are required by the website will reside in this folder only.
The pre-rendering of pages in Next.js is based on the two concepts below.
- Static generation (optimal approach) — HTML is generated at build time and will be reused on each request. This is the optimal approach because the generated HTML and JSON files are cached by the CDN for best performance. There are two functions that the framework provides for working with external data: 1) getStaticProps — Put in your external data to be pre-rendered in here. 2)getStaticPaths — Getting routes based on external data. This has to do with dynamic routing and is used in conjunction with getStaticProps.
- Server-side generation (SSR) — The HTML for the page is generated on each and every request. getServerSideProps is the function that is used when SSR is needed for page rendering content.
There is also fetch data on the client-side via a react hook called SWR. More on that can be found from here.
Looking into the blog project, you should be able to see the public and pages folder among others. Index.js under pages is the entry point of the blog and the blogs are loaded from _posts folder. Notice the getStaticProps function that calls the getAllPosts() method inside the api folder to obtain and load the blog content.
We are going to modify the project such that the blog content is loaded from an AWS S3 bucket.
Be sure to install the aws-sdk by running.
npm install aws-sdk
Replace the following code inside api.js located under the lib folder of the project.
api.js
import matter from 'gray-matter'let AWS = require('aws-sdk');AWS.config.update({
accessKeyId:process.env.accessKeyId,
secretAccessKey:process.env.secretAccessKey,
region:"us-east-1"
});let s3 = new AWS.S3({apiVersion: '2012-08-10'});export async function getPostSlugs() {
let filenames = [];try {
 let params = {
 Bucket: "<Bucket name>",
 }; const s3_keys = await s3.listObjectsV2(params).promise(); s3_keys.Contents.map((item) => {
 if(item.Key.endsWith(".md")){
  filenames.push(item.Key)
  }
 }); return filenames;
} catch (e){
 console.log(e);
 throw new Error(e);
}}export async function getPostBySlug(slug, fields = []) {
 const realSlug = slug.endsWith(".md") ? slug.replace(/\.md$/, '') : slug;
 let filecontent = {}; try {
  let params = {
  Bucket: "<Bucket name>",
  Key: slug.endsWith(".md") ? slug : slug + '.md'
  };

  let s3_data = await s3.getObject(params).promise();
  filecontent = s3_data.Body.toString('ascii');
  let { data, content } = matter(filecontent);
  let items = {};
  fields.forEach((field) => {
    if (field === 'slug') {
     items[field] = realSlug
    }    if (field === 'content') {
    items[field] = content
    }    if (data[field]) {
    items[field] = data[field]
    }
 })
 return items
 } catch (e) {
 console.log(e);
 throw new Error(e);
}}export async function getAllPosts(fields = []) { const slugs = await getPostSlugs();
 let arrayPromise = [];
 let posts = slugs.map((slug) => {
  arrayPromise.push(getPostBySlug(slug,fields))
  }) let post = await Promise.all(arrayPromise);
 post = post.sort((post1,post2) => (post1.date > post2.date ? '-1' :  '1')); return post
}
You will notice the use of environment variables that sets the credentials for accessing S3 bucket. Setup a .env.local file like this at the root of your directory.
.env.local
accessKeyId=xxxxxxx
secretAccessKey=xxxxx
Another modification is to add the ‘await’ keyword in front of all method calls (getAllPosts,getPostBySlug) in index.js and [slug].js files.
Upload the files under _posts folder of the directory into the S3 bucket and run
npm run dev
You should now be able to view the posts indicating that the posts are now being loaded from S3 and not from your local storage.
Deployment:
Deploying projects with Vercel can be done by
- Git Integration — make deployments with Git by using either the Vercel for GitHub, Vercel for GitLab, or Vercel for Bitbucket integrations.
- Deploy Hooks — Deploy Hooks allow you to create URLs that accept HTTP POST requests to trigger deployments, re-running the Build Step, from outside of Vercel. For example, rebuilding your site to reflect changes in a Headless CMS or scheduling deployments with Cron Jobs.
- Vercel CLI — Deploy with a single command from the terminal
- Vercel API — Deployments are done by making an HTTP POST request to the relevant endpoint, including the files you wish to deploy as the body.
We will deploy via the CLI and then push the project to github. Once in github we can integrate it with Vercel.
Install vercel by running
npm i -g vercel
and then run
vercel
from the root of your directory to initiate deployment. The build fails because we use environment variables that are yet to be set up for the deployed project. (Note: The initial deployment by vercel creates a preview and a production deployment)
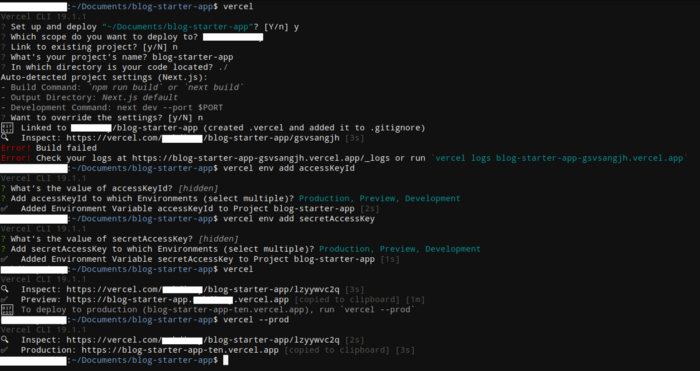
Environment variables via the CLI can be added by running
vercel env add YOUR_ENV_NAME
You can also set up the environment variables via the dashboard.
Run the following to deploy in preview or production in deployments.
vercel
vercel --prod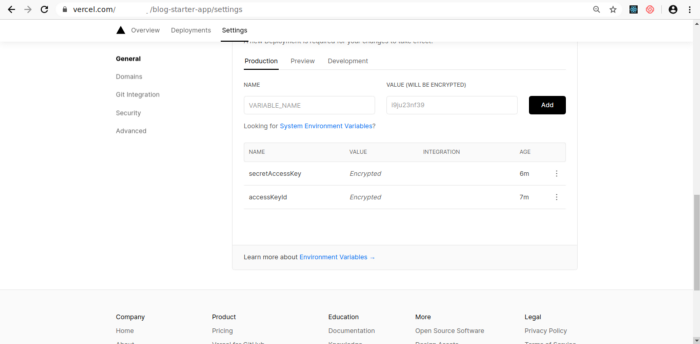
Create a repository and commit the project (ensure to check .env.local and node_modules are included in .gitignore). Once done, link your project to Vercel from project settings.
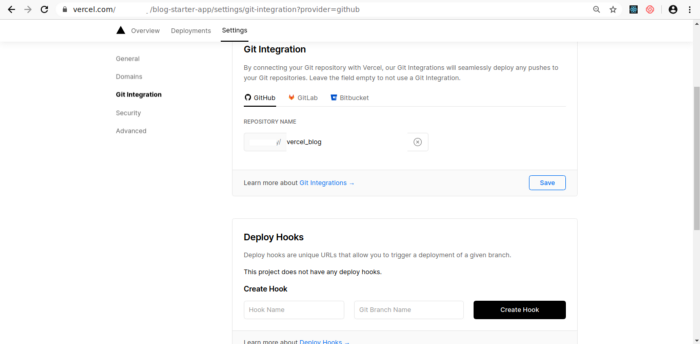
The interesting thing here is that after you integrate your repository, any subsequent commits to github will result in Vercel automatically deploying your project changes. Commits to the default branch (master) will result in a production deployment. More on managing deployments can be studied from here.
Additional Settings:
Some configurations that you may want to alter for your project.
- Custom domains — By default, all deployments are assigned a .vercel.app suffixed domain. This domain can be replaced with a custom domain of your choice under project settings at the Vercel dashboard.
- Altering project settings using vercel.json — For advanced usage, this file can be set up to specify env variables during build time, configurations for the serverless functions, set up custom routes and redirects, deployment regions, github integration rules, behaviour of Vercel CLI and more. In-depth documentation on how to setup vercel.json can be looked up from here.
Conclusion:
We have explored how Vercel allows us to create and manage Jamstack deployments with ease. Having separate deployments (preview & production) makes it easy to build websites at a much faster pace with a collaborative approach. With serverless functions, you almost never have to think about managing the underlying infrastructure, and it’s cost-effective as well. Vercel Edge Network supports caching, encryption, and compression (using Gzip & Brotli) by default so you don’t have to worry about efficient content delivery. Vercel succeeds in streamlining development workflows, so Vercel is definitely an option when considering a deployment platform for static front-end websites.


%20(1).svg)

.svg)


