

Our client was not satisfied with the error handling that Amplify provided out of the box. Switching to Hosted UI proved to be easier and quicker than building custom error handling.
General Setup and Configuration
There’s a short checklist of things you need to have/configure before we get started. If you’re already using Amplify’s authenticator you should have this already.
☑️ Amplify CLI installed on your machine
☑️ aws-amplify package added to your project
Install the Amplify CLI
In terminal, run
$ npm i -g @aws-amplify/cliInstall Amplify in your project
In terminal, run
$ npm i aws-amplify
Get Started
Configure an AWS Profile
If you already have an AWS profile configured on your machine, skip ahead to the Initialize section.
In terminal, run
$ amplify configure
This will take you through a series of prompts where you will need the AWS Region for your app, and a new IAM username to create a new IAM user in your AWS account. From there it will have you complete the user creation in the AWS console — this is preconfigured, so you can just click through to the end.
You should eventually end up on a screen with the new user’s Access Key ID and Secret Access Key. Copy and paste those into terminal and complete the process.
You can always check what credentials you have stored by opening
~/.aws/credentials
Initialize Amplify in Your Project
If you already have Amplify initialized in your app, you can skip ahead to adding auth
In terminal, navigate to your project’s root directory and run
amplify init
It’s going to ask you for several pieces of information:
- Name for the project
- Name for the environment
- Default code editor
- Type of app you’re building (for this we are using JS)
- What framework you’re using
- Source directory path
- Distribution directory path
- Build command
- Start command
Once that is filled out, it will prompt you to choose the AWS profile you want to use — select it from the list, and it will initialize your app.
Add Amplify Auth to Your Project
After you have initialized Amplify, run
$ amplify add auth
It will prompt you to select which type of authentication and security you want to add. I won’t be going over it in this article, but we wanted to make sure our client would have the flexibility to authenticate through social providers in the future if they wanted to, so we went with Federated authentication.
From there it will get some more details from you regarding how your users will sign in, so pick your poison. From there it will ask you if you want to configure advanced settings — this includes what information you want to get from social providers, sign in methods they can use, and others. Skip this for now, and decline to change advanced settings.
The next few prompts are for your sign-in/out redirect URLs. You can add additional URLs later in the AWS console, so don’t stress if you haven’t finalized this yet. For testing purposes feel free to put localhost as the URL.
Lastly, it will ask you which providers you want to add, but again, we’re skipping this for now.
Pushing Changes to the Cloud
This one is easy. In terminal, run
$ amplify push
Once complete, this gives you your Hosted UI endpoint (use the 2nd one)which we can then plug into our app as a sign-in link.
Integrating the Hosted UI in to your app
From here, integrating the Hosted UI into your app is pretty simple! In App.js add
import Amplify from 'aws-amplify';
import awsconfig from './aws-exports';
Amplify.configure(awsconfig);
With that done, make sure your callback URL is present in your app’s routing, and then all you have to do is set up your sign-in button to link to the Hosted UI URL you just generated. The user will be routed to the login page, and upon successful authentication, back to your app to the callback URL you specified. That’s it!
If you need it for future reference, here is the anatomy of a Hosted UI endpoint:
https://<DOMAIN NAME>/login?response_type=<OAUTH FLOW TYPE>&client_id=<CLIENT ID>&redirect_uri=<REDITRECT URL>
Customizing the Hosted UI
Customizing (both under the hood and visually) is done in Cognito > Manage User Pools > [User Pool].
Under The Hood
To change under-the-hood options, like OAuth flows, and callback URLs, go to App Client Settings. There are a few different things on this screen:
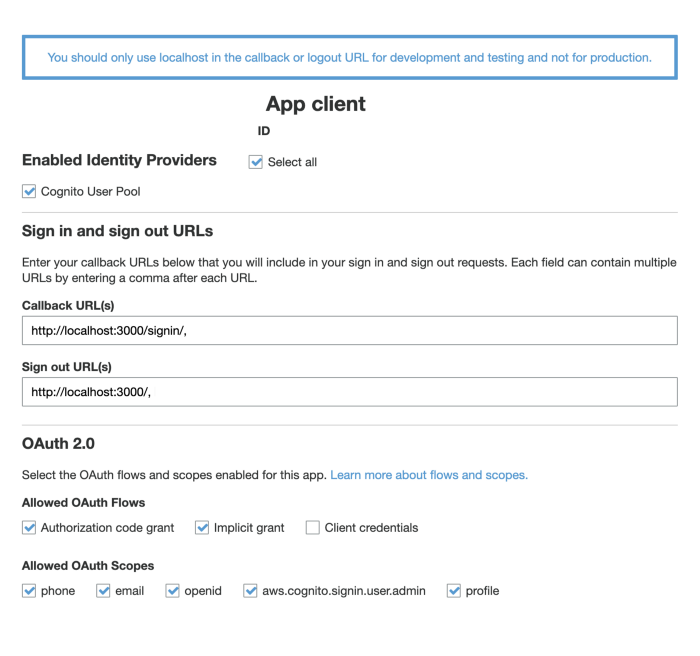
Enabled Identity Providers
This is a list of all the providers available for your app to use. You can set up more under Federation > Identity Providers. For this tutorial, just make sure Cognito User Pool is selected.
Sign in and sign out URLs
This is where you can add additional callback and sign out URLs.
Allowed OAuth Flows
Each of these flows has countless articles written about them, so I won’t go too in-depth on any of them individually, but the gist is that they change how you receive user info and authorization.
- Authorization code grant: After completing the authorization prompt, the user is redirected back to the app with an authorization code for an access token. Using the hosted UI in tandem with Amplify also creates a user session.
- Implicit grant: After completing the authorization prompt, the user is redirected back to the app with a JWT token in the URL. When decoded, the token should look something like this:
at_hash: "_a1B2c3d4E5-abc123_A"
aud: "abcdef12345"
auth_time: 1500000000
cognito:username: "abc123-ab12-ab12-12ab-abcd1234"
email: "email.email.com"
email_verified: true
exp: 1560000000
iat: 156000000
iss: "https://cognito.region.amazonaws.com/region_A123B456"
sub: "abc123-ab12-ab12-12ab-abcd1234"
token_use: "id"
The major downside of the implicit grant flow is that the entire token is sent in the URL. The token does have an expiration on it, but it is still logged in the browser’s history, making it inherently less secure. Additionally, since the access token is exposed on the client-side, there is no refresh token.
Allowed OAuth Scopes
Scopes define what pieces of user information your app can have access to. If, for example, the scope has been set up for just phone and email, and your app requests phone, email, and profile, the request will not fail, but your app will not receive any information for the profile. This can be precarious if your app does not have any error handling built-in for this situation. For this article, we’re just going to leave them all ticked.
Visual
Go to the UI Customization tab to change colors, margins, add logos, etc.


%20(1).svg)

.svg)


