Introduction
When discussing challenges in the education system, we can identify that measuring student’s attention is challenging, especially in a virtual environment, where there is a lack of closeness between students and the educator. It’s known through various research efforts that students in virtual environments engage and participate less in the virtual classroom than those in a normal classroom. As a consequence, students in virtual environments find the learning experience more challenging, and as a result, their learning is negatively affected.
One way to mitigate this problem is when the teacher implements “active learning” strategies, which consist of different activities that stimulate and engage the students:
- Propose debates
- Q&A sessions
- Ask student’s opinions
- Group discussions
- Facilitate student-to-student interactions
However, to properly implement these strategies, an educator needs to balance their explanations with these active learning strategies. One important metric for balancing that is the “engagement level” of each student. In a virtual environment, this is very challenging to measure.
Measuring Attention Level
In 2020, a group of researchers from Georgia Southern University presented an approach to identify the attentiveness of students. They conducted an experiment in which students’ faces were recorded while they were in a class. It gave a dataset of face pictures, which they proceeded to label as attentive or inattentive, based on expert supervision (human labeling). After that, they trained a machine learning model based on the data set which identifies the attention level of a student's face.
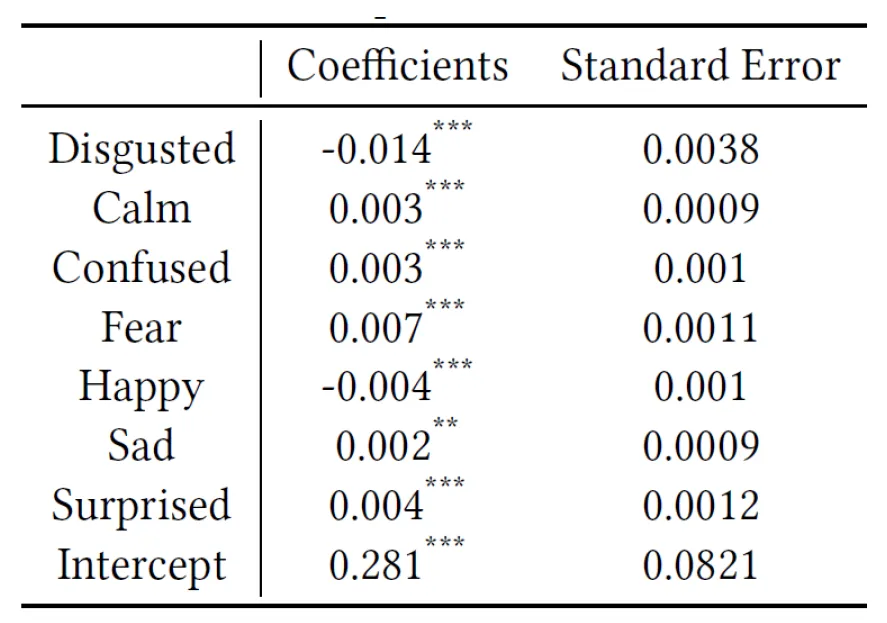
After getting a working model for identifying attention level, they correlated that model with emotions identified using AWS Rekognition. They made a correlation between the model attention level and the emotions identified by AWS Rekognition. As part of that correlation, they crafted the following formula which helps in identifying attention levels based on the AWS Rekognition emotions for a face:

The values of the formula can be found in the following correlation table:
Disclaimer
Using this formula we can get the attention level of a student’s face, but it’s important to mention this is an approximation using a correlation between the different emotions of a face and the student’s attention level. Therefore, it’s an academic exercise and should not be considered the reality of a student’s engagement with the class. It’s only an approximation that serves as a starting point for analyzing trends and adapting the teaching strategies accordingly. It’s critical for educators and technologists to use these tools as supplements, not replacements, in a live education setting.
Architecture
So, we want to create a system that measures and gives recommendations to the teacher as the virtual class progresses. In this post, I present an approach using event-driven and serverless architecture to accomplish the following tasks:
- Capture screenshots of students’ faces as they participate in a virtual class
- Automatically identify and analyze all students’ faces, and get emotion coefficients using AWS Rekognition
- Determine the attention level of each student and the overall attention level for the class
- Recommend an activity to the teacher
So, we can identify a couple of modules or services to accomplish it, as shown in the following high-level overview:
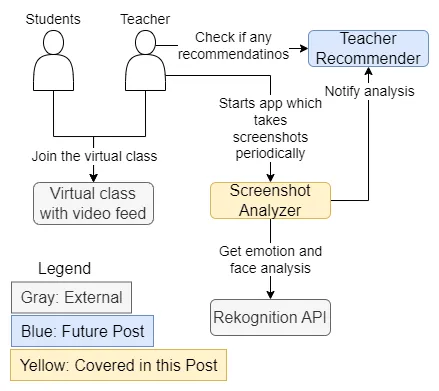
As marked in the diagram, this blog post will cover the “Screenshot Analyzer” system. The “Teacher Recommender” will be covered in a future blog post
Expanding on the “Screenshot Analyzer” system, we can delve into the detailed design with the following diagram that shows the AWS resources and services that we’ll be using to build the solution:
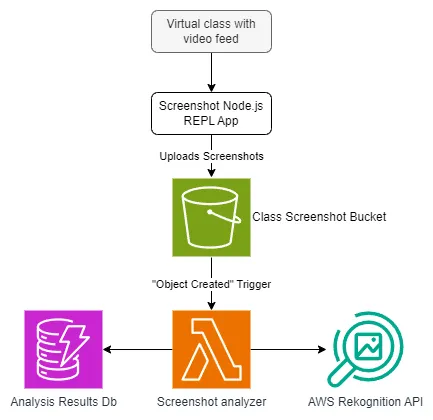
In the image, we can see that the idea is to have a Node.js console application take screenshots of the virtual class video in a set interval of time. Each screenshot gets uploaded to an S3 bucket where a Lambda function gets triggered every time a new screenshot gets created. This Lambda is responsible for analyzing the screenshot, extracting the faces, and posting the results in a DynamoDB table.
Solution
Screenshot App
For the screenshot application, we can use the npm package “screenshot-desktop” to take the screenshots from our node.js application. Using a simple “setInterval” in javascript, we can set a recurring timer that takes a screenshot, and then uploads the image buffer into an S3 bucket using the AWS SDK for javascript (v3), as shown in the following code snippet:
  setInterval(async () => {
  const screenshotTime = getTimestamp()
  // For example:
  // - /classes/2022-01-01/classid-123456/screenshotid-9518945.jpg
  // - /classes/2022-01-01/classid-123456/screenshotid-3159841.jpg
  const screenshotFilePath = `${basePath}/screenshotid-${screenshotTime}.${SCREENSHOTS_FORMAT}`
  try {
    const imgBuffer = await screenshot({ format: SCREENSHOTS_FORMAT })
    const metadata = {
      classId: classId.toString(),
      classStartedAtTimestamp: getTimestamp(startDate).toString(),
      screenshotTime: screenshotTime.toString(),
      screenshotBasePath: basePath,
    }
    await aws.s3.uploadToS3(BUCKET_NAME, screenshotFilePath, imgBuffer, metadata)
  } catch (error) {
    console.log('err', error)
    logMsg('Error taking and saving screenshot.', error, { screenshotTime, screenshotFilePath })
  }
}, SCREENSHOT_INTERVAL_SECONDS * 1000)
(Full code repo can be found in the References section at the end of the article)
Screenshot Analyzer
After a new screenshot gets added to the S3 bucket, we “hook up” a Lambda to the S3 so that the Lambda gets triggered automatically when a new screenshot gets uploaded. Using the Serverless Framework, this can be done easily as shown in the following code snippet:
events: [
    {
      s3: {
        bucket: `${process.env.BUCKET_NAME || '${env:BUCKET_NAME}'}-${process.env.STAGE || '${env:STAGE}'}`,
        event: 's3:ObjectCreated:*',
        existing: true,
        rules: [{ suffix: '.jpg' }],
        forceDeploy: true, // Used to force cloudformation to update the trigger no matter what
      }
    }
  ]
The reference to the bucket is saved in an environment variable for easier management across different stages and deployments.
In the Lambda code, the following bullet points are needed to complete the analysis:
- Download the screenshot from S3
- Identify each face that’s in the screenshot, along with bounding borders and emotions of each face
- Use the “sharp” npm package to extract and save each individual face as its own image
- Upload each cropped face into another S3 bucket for future reference
- Save the results into a DynamoDB Table for other consumers to use
The following code snippet shows the Lambda handler processor, which orchestrates those tasks:
const processEvent = async (eventRecord: S3EventRecord): Promise<void> => {
  const {
    bucket: { name: imageBucketName },
    object: { key: imageObjectKey },
  } = eventRecord.s3
  try {
    const faceAnalysisResults = await AttentionService.analyzeImage(imageObjectKey)
    const { Body, Metadata: screenshotMetadata } = await aws.s3.getObject(imageBucketName, imageObjectKey)
    const {
      classid: classId,
      classstarteddatetimestamp: classStartedDateTimestamp,
      screenshottime: screenshotTime,
      screenshotbasepath: screenshotBasePath,
    } = screenshotMetadata


    const completeFaceAnalysisResults = await extractFaces(faceAnalysisResults, Body as Readable, screenshotTime, classId)


    await AttentionService.publishResults(
      completeFaceAnalysisResults,
      classId,
      classStartedDateTimestamp,
      screenshotTime,
      screenshotBasePath,
      imageObjectKey
    )
  }
  catch (ex) {
    console.error('Error processing s3 event record', inspect(eventRecord))
  }
}
When analyzing the image, we use AWS Rekognition to detect faces and get the levels of emotions per face, as shown in the code snippet below. Note that to calculate the attention level of a face, we use the emotions detected by AWS Rekognition (which gets calculated using the formula explained in the above sections).
const analyzeImage = async (s3ObjectKey: string): Promise<FaceAnalysisResult[]> => {
  try {
    const results = await aws.rekognition.detectFaces(BUCKET_NAME, s3ObjectKey)
    const createdAt = getTimestamp()
    return results.FaceDetails
      // .filter(face => shouldDiscardReading(face)) // (TODO): uncomment this line to discard faces with low confidence
      .map((face, i) => ({
        ...face,
        index: i + 1,
        analysisCreatedAt: createdAt,
        Landmarks: undefined,
        attentionLevel: roundNum(calculateAttentionLevel(face.Emotions) * 100, 2), // convert to percentage
        isUncertainAnalysis: isUncertainAnalysis(face.Emotions),
      }))
  }
  catch (ex) {
    console.error('Error calculating screenshot raw attention', ex, s3ObjectKey)
  }
}
For extracting the faces and cropping them, we use the “sharp” npm package, which has an easy-to-use API for this kind of operation (as long as we have the “bounding box” from the AWS Rekognition analysis results) as shown in the code snippet below:
const { BoundingBox } = faceAnalysisResult;
const screenshot = await streamToBuffer(screenshotStream);
const {
  height: screenshotHeight,
  width: screenshotWidth,
} = await sharp(screenshot).metadata();


const faceHeight = Math.round(BoundingBox.Height * screenshotHeight) + (pixelsOffset * 2);
const faceWidth = Math.round(BoundingBox.Width * screenshotWidth) + (pixelsOffset * 2);
const faceTop = Math.round(BoundingBox.Top * screenshotHeight) - pixelsOffset;
const faceLeft = Math.round(BoundingBox.Left * screenshotWidth) - pixelsOffset;


// Limits the face extraction to the screenshot size
const height = faceHeight > screenshotHeight ? screenshotHeight : faceHeight;
const width = faceWidth > screenshotWidth ? screenshotWidth : faceWidth;
const top = faceTop <= 0 ? screenshotHeight : faceTop;
const left = faceLeft <= 0 ? screenshotWidth : faceLeft;
// Extracts the face from the screenshot
const faceBuffer = await sharp(screenshot).extract({
  height,
  width,
  top,
  left,
}).toBuffer();
return faceBuffer;
(Full code repo can be found in the References section at the end of the article)
Future Work
While this article gave an overview of the solution as a whole, it only delved into the “screenshot analyzer” section. In future articles, we will explore other components, especially the “Teacher recommender” system, which provides tailored activity suggestions based on the data that was collected by the screenshot analysis.
Stay tuned for future updates where we will dive deeper into these components!
Conclusion
In this article, we covered a “learning recommendation system”, which aims to improve the challenge of measuring and enhancing student engagement in virtual learning environments. By using the machine learning capabilities built into AWS Rekognition, we can detect and extract the faces of students in a virtual classroom, then analyze them and save them for future use by a teacher recommender app for tailor-made recommendations that aim to improve the learning experience.
Using serverless architecture, we designed an effective and efficient system that accomplishes the goal of analyzing and calculating student engagement in a virtual classroom.
Stay tuned for the teacher recommender system in a future article!
References
- Paper for calculating attention level:
- Tabassum, T., Allen, A. A., & De, P. (2020). Non-intrusive Identification of Student Attentiveness and Finding Their Correlation with Detectable Facial Emotions. ACM Southeast Conference - ACMSE 2020 - Session 1, 127-134.
- AWS Rekognition “Detect Faces” Documentation:
- Screenshot App Full Code: https://github.com/LucasVera/eafit-screenshot-app
- Screenshot Analyzer Full Code: https://github.com/LucasVera/screenshot-analyzer
- Link to my master’s Thesis (Spanish): https://repository.eafit.edu.co/items/191b580f-8415-489e-a5a5-e42776712258


%20(1).svg)

.svg)